During our monthly dose of joy, Lorraine taught us how to make Winter Wonderlands! This craft combines all of our previous crafts: fancy lettering, using different materials, making everything “cattywampus”, mindful drawing, and more. While this may be our last official Joy Break, you can watch the rest of Lorraine’s Joy Breaks on our site and reach out to her via our ambassador page! Thanks for some amazing Joy Breaks, Lorraine, and we hope you all enjoy this one!
You can listen to the audio below. To download the audio, click here.
Read the transcript below or click here to download it.
Note: This is not a flawless word-for-word transcript, but it’s close.
Lorraine Wilson (Ambassador, Davis Phinney Foundation):
So, I made a sheet of some small circles. I know we like to work large and that’s very important. Thinking about both movement and our hands to make things. So, I am going to get a pen, and if you weren’t with us on day one a while ago, although we’ve done this more than once, these are preprinted. But if you’ve not yet made any kind of photocopy of dots, you don’t have two circles. But if you want to make it yourself, it’s probably even better. So, the one circle to kind of get our fingers, hand, wrist, arm, really a whole arm movement is recommended here. I would go ahead first and make a counter clock. Oh, come on pen. Whoop, that pen needs a little work. Let me get another one. That happens.
Here we go. So, I’m going to go counterclockwise first. And it’s interesting. I don’t usually do very good counterclockwise. That’s okay. That’s why I practice and warm up. It’s good for me. And on this one, I’m going to start at the center and go out. And if you remember, or if you’re just doing this for the first time, this is where we’re trying to just kind of thoughtfully, mindfully, basically we’re building a clock. So, this would be the equivalent there, right? So, we’re going to go to six next. Now I’m just using my hand, but if I want to involve my whole arm, there we go. When I’m pushing, I tend to use just my hand when I’m pulling. I find it easier indeed to use my arm and usually center out. It’s a little easier for me. I don’t know about you, but now we went that way. Now let’s go clockwise.
I tend to get a little better circle except I went more oval on this one. Okay? And now I don’t know about you. But it’s somewhat of a challenge for me. I’m going to go from outside in and when I say it’s a challenge, it’s just making sure to find this center point. This reminds me of when the neurologist wants me to touch my nose and their finger and then they keep moving their finger from left to right. It’s like a moving target. And so, finding this center very neatly, is like a moving target. See, those are close, those are far so not terribly equal distance, but that’s why we practice and warm up with such things. So, does speed help the slowness health? I’m going to do one more on my small side.
I’m going to pick this one and I’m going to go from out to in. Now granted you might say, say, well what if we just go all the way down, you can and then we could go all the way across. Those are pretty nice-looking quadrants. And then if I go out or if I go in, ah, in just doesn’t work for me. I don’t know about you So we’re getting warmed up. If you don’t like the way this particular pen or pencil, whatever you’re using feels on the paper, grab a different one. I’m going to get a pencil and a pen. That was a micron, but you can feel and that really helps you. Oh, a pencil’s nice and smooth compared to a marker.
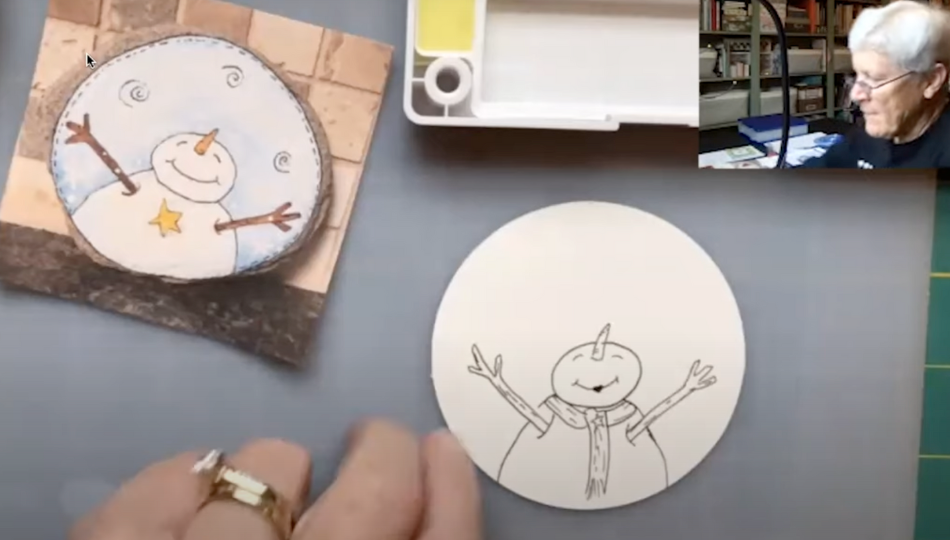
I like that. See what’s working for you. I don’t know about you, but December snuck up on me. It’s amazing. On this particular paper, the ink doesn’t even write quite as smoothly as the pencil. I’m interested in that. Hmm. I have copier paper in about four different weights. Wonder what weight this is. I don’t remember. All right, the last one. Whether you go in or out, just kind of get your hands warmed up and we are going to look, oh, that’s not bad. It feels pretty good. Yay. So, we are going to look at what we’re doing now. This one is on rock. Anybody who’s been around the nose, I like the paint on rocks. I like the texture, the dimension, but we’re going to do this little cutie patootie. This is just painted and a micron. I also if you’ve got any what do they call it?
Glitter glue. The glitter is fun. To add to these stars or snowflakes or sparkles, however, you choose to do this. Here is one that was my original rock and this one has a star on this one I decided to go with a scarf. This one is just three charcoal buttons. Now, why am I doing these little snowmen like this? My cats have decided, and the young cats have decided they like climbing the Christmas tree. It’s kind of problematic. So, I have a metal tree and I’m just hanging these little paper ornaments on them, and we’ll talk about how to cut the circles. There are many ways you can freehand it. You can use some devices that help, and I’ll show you what we’ve got. You can improvise as well. You make these any size. These are approximately three and a half, four inches.
And we’re going to look at different ways to do the snowman and time committing. Or if you’re interested, we will look at this little chick. He’s more oval than round, but we can make him round if you would prefer all round. We’re also going to talk about the options. Maybe you guys like stamps like I do. So, this is what is called a house mouse. And the house mouse stamps just make me smile. I love house mouse. This is one. And in order to have a little border, just put a little piece of paper on the back. And so, it’s one stamp that is the Christmas lights, one stamp that is one of the house mouse critters. I put a little cap on him. And then these are just little marks I made using a fine micron to look somewhat like snow and little, yeah, get little interaction going on.
So that’s fun. And then this one is the original rock but on our circle. So, let’s talk about our circles kind of quickly. Won’t be too time-consuming here. We’ll come back to this one. You might have noticed I used vellum to make a snow globe in essence. And when I actually finish it inside will be the little snow pieces that make it look like an actual snow globe you would shake. And of course, all of this can be colored but that’s just another fun way we’re going to look at that. So, let’s start with how we might cut this. Yes, you can do it freehand. And if you have an old tape piece, this is the perfect size, let me show you.
And even if you’re using a real tree or an artificial tree and you have all your own ornaments set and ready to go, who’s to say you can’t add some little paper ornaments like this and embellish them? So here we’re going to go ahead and just take the tape, the empty tape roll. There’s a lovely circle. I think it’s a lovely circle. And we can use scissors. So, this would be one way to just very gently then we’re very, I guess with concentration, I should say, by paying attention. Go ahead and start cutting your circle, right? Well, let’s look at some options. Some of you may be like me and you may be former scrapbookers or maybe you still scrapbook, but it’s really slowed down a lot. This is a series of blades from what do you think of those of you who know creative memories.
So, I am going to take a circle and there’s a variety of these. So, I can go inside, I can go outside. I’ve got a very large. But what’s really neat or what I think is very neat, and you, there’s many systems like this, you don’t have to buy creative memories and you may not need to be cutting out circles. Tracing them and cutting them is fine. But what you can is that the two lines on the red are pretty close. Little further, little further apart, right? So, here’s what you do. If you take this blade, which is inside, you have to pull it out. You’ll notice that that’s the width from these little posts to the blade. Will the post go in this guide and then you just start pulling? So that would give me a circle that size. Well, what if I want one smaller? Well, then I go to the next size. And if I put this one here and I’m just demoing this for you. Now you’re going to see this in just a moment. Let me get the big one.
So, what you’ll notice is this was the closest. It’s going to give you the tightest or biggest circle you can out of this particular one. Then we go here, and you notice that it is just slightly bigger, which makes the circle smaller. And then the biggest. So, I’m going to go back to this and I’m going to go to this. There we go. Put this on. Oh, you could also of course use a blade this and cut around your tape. So that’s a variety of ways we can get those circles. I am going to now make a neat one and I’m going to go here with this one.
And you’ll notice that I’m cutting on a board that they call them self-healing. If you’re a quilter, a sore seamstress, what have you, you may have something like this. And so, I’m going to punch that out. Now when it comes to the snowman, you are welcome to stick to, I want to go to a smoother surface now that I’m not cutting, otherwise I’ll get little ridges. So here. Now how do we draw this little guy? What’s or gal who, you know your snowman maybe? I don’t know what your snowman is. What I like to do is actually start with the head. So, here’s the one I’m going to be using a similar size here, okay? And I just like to basically get that little oval roundish head going. Now that’s, I know I’m doing it in pencil and it’s rather light, but if I do dark first, well, I’m going to go ahead. We’ll just do dark first. Nothing sacred about this little snowman if I mess him up. Let me get this pen.
So, I am going to leave a little spot here. And if you’re worried that you can’t even freehand this I think that there’s an example of this on the paper that you may have downloaded for the schedule, and you could just cut it out and trace it. And I’m going to leave my little spot from a carrot nose. So now we’re going to go in and we’re just going to kind of put our little nose kind of perfect. Just what do we want to do? A little bit of this. Then we’ll get a little mark here and there. And there’s our little carrot nose. All right, now the eyes, eyes are right here. Pretty simple. Let’s put on a nice big grin. I’m the, I’m going to make this one a little girl with a little heart lip. That’s fun, now what about the body? You don’t want just, I mean, you, you can, I shouldn’t say you don’t want, you could, if you want, just have a little circle here.
Like if your snowman was a traditional 1, 2, 3, right? But I’m going to go kind of plump like this one. You do what you want and I’m, and I think I want my sticks. Oh, did you notice all of my little snowmen have their arms up for Every Victory Counts? Still want plain old sticky arms for a snowman. We want to have Every Victory Count. So, I’m going to go right about here, see where the smile is. I’m going to come right off that and again, I’m using a permanent marker here. You might be using a pencil, which can, which you have options. I’m going to be a little cattywampus. I don’t want it perfectly centered. And then I’m going to do this meaning that’s kind of the snowman’s armpit if that’s such a thing. Bring my stick out. Okay, we’re going to get a little finger action. I know we just have kind of a threesome on this.
You can also bring a little stick down here if you wanted to like it, well I’ll show you over here. So, if we go like this and we go one, two, we can come down further to get three. Doesn’t have to be you, you make it anybody you want. You can put little lines in this as if those represent the part of the branch. Also, when we color, you might use dark and light brown in order to get that shape you want. Now I have to admit, the star is cute and if you want to go with the star, let me point something out.
Here is a nice, neat star, the good old-fashioned way that I learned how to do it, Hazel. But this one you’ll notice is a little more cattywampus. So, I like to do that and then come this way and then I’m going to go just a little one here and a bigger one there. But you can do anything you want with the star. If you want to do star, I don’t know if you can see, but there are tiny black dots just around when we start coloring and painting, that’s fine. Using a paint pen. Posca is my favorite, but there are a variety. You can use some of the white gel pens for this. They work pretty well. But that’s where we’re going to go ahead and do these little white stars, which on this one I’ve done this way. On this one, I’ve actually done them as stars and the other way. Yeah. So that’s kind of fun. And sometimes people will just go 1, 2, 3, 1, 2, 3 and they’ll go big little, small. Yeah, you do what you want, what looks good for you, how do you like your little stars?
So, we’ve come here to our little girl, little guy. And I think I’m going to stick with the scarf because I want to show you how to do the scarf if you’re interested. Scarfs, I think we’re all pretty good with not that the, of course, the three cold buttons, three circles going to do black. Yeah, short and sweet. Okay, so on her I am going to bring my scarf from the edge of the shoulder, just about like that. Let her have a little neck. Okay, going to bring like if we have it indeed tucked over, we’re going to do a little bit of this, okay? Then we’re going to take this side and if you want to, of course, you can add a few lines to represent the fabric-y look of a scarf. And you know what, I’m going to put a little scar-shaped pen right here to be holding her scarf on. Yeah.
Okay. Now the other things in the background, let’s do in a moment. So, I don’t know if you’re using markers, colored pens, colored pencils, or watercolor pencils, but I think I am going to use watercolor. We’ve used the others quite well. I know what I’m going to do. Half and half. I am going to do red. No. Yeah. Now let’s go green for this part. Then red, let’s go green. So, these are watercolor pencils. This particular brand is gold fiber aqua. I have a variety, you may as well. But I am just going to color, this is what I love about watercolor pencils.
You just color like it’s a pencil. And then we’re going to add a touch of water. I’m lying, I am layering on quite a bit. I want this to be relatively intense and if you wanted to, you could get a darker green to add a little bit of depth while you’re coloring and just take your time and enjoy. I like to listen to the pencil on the paper. I am using watercolor paper. I’ve failed to mention that you may be using copier paper, any kind of paper that you have available. Okay? Now, what do we do? We take, this happens to be a watercolor paintbrush, but you could take a regular paintbrush and I have a, I love these, these, I don’t know if you guys have seen these, I know this is messy, but it travels with me because it collapses. I love that.
So, I am going to get my brush primed and these come just like paint brushes and a variety of sizes of the brush itself. I’m just going to add a little water. I know we’re not finished with a picture, but I just want to show you, and I think you’ve used these, we’ve used them, but we just get a nice soft smoothing, smoothing of the watercolor pencil. Okay? Now, this is a set of watercolor paints, and you can just use, you know, a $3 children’s set. I really actually kind of like the praying, I think they’re 10 or 20 based on how many little colors you get in there. But I want to use just a little bit of blue nail from this. And I’m just going to add just a little bit of color to my little snowman lady and a little bit to the sky. And then I’m going to darken it. Now, this is a very bright blue compared to what we might use, but I wanted it to really show up for you. You can put down wax paper, or a paper towel when you’re painting or using your pencils, probably could, and should do that.
And I am going to make it just a little darker at the bottom. Tends to be what I do when I make these. I love making the snowman. My little wire tree is just going to have a snowman and a house mouse theme right now. If I start using more water, I can just spread this without adding more paint because the water is what moves it around. And remember not to be judgmental of your work. When you get finished, I guess you could say it satisfies you where it doesn’t. But always let a picture kind of unfold. Let it develop before you start thinking, oh, I don’t like it. Ah, we like them. Now I’m going to show you all this little section is wet. I’m going to show you something with the watercolor pencil,
Okay? First I showed you, apply a pencil and then get wet. Now I’m going to show you here we have some water. Watch what happens when we add the watercolor pencil. It will smooth out now because I have a pretty good amount of water on here. You’re going to see a little bit of peeling off the paper. Don’t let that bother you. But you do want to be a little bit careful, and you can finish this off in a variety of ways. We’ll look at some of those. Once we get more than much paint we want to apply. There’s just something fun about snowmen. We don’t even have to name him Frosty, right? We just actually this, well, this would be frosted kind of put a little lip on it.
That’s fun. All right, so we’re getting a little puckering from where I added a lot of water, not to worry. Okay, so I’m going to show you two arms. We’ll do this one with the watercolor and I want to have just a little bit of reddish brown right about there. And then I want a little bit darker, right about there. Okay then, just because we have penciled out as well, let’s look at how it goes with pencils. And they’re not going to put water on these. Let’s just see how they look.
That’s nice too, I like it. One of our pecan trees died. Actually, I’m going to go ahead and darken this one up. One of our pecan trees died. So last week we had it cut down and I asked them to cut some pieces for me. Half of a limb. That was about mm, six inches in diameter. And so now I’ve been stenciling and making Christmas decorations out of those pieces of wood. Now, what shall we do with her little nose? Shall we watercolor or pencil? I’m going to watercolor. So, I’m going to go with this nice security orange.
You also notice that with the watercolor, you know, you can get these spots. So, at the end, especially on something this small, I’m just going to, like, that so it’s all as close to the same color as possible. Yeah, so she’s beginning to look pretty good here. Do we want to do anything else to her? So, she has a wee bit of color. Just kind of move these around a little. And I don’t know, if we think about strawberries and how we get nice color of strawberries, we might dip a little pinkish juice, reddish juice on our snowman or snow grill.
I think I’ll just get a little color there. A little color there. Okay. Okay, so fun. She’s just having a good day. Now let’s talk about our background. What would we like to do? How about our little pinwheels first? I don’t know why, but I like the pinwheel. So, I’m going to get my marker. Actually, it’s going to need to dry a little bit. First, let’s see what’s dry. Nothing’s terribly dry. Let’s go ahead and add, you might be using a white pencil white paint or in my case, I’m going to use the white Posca paint. And all we have to do with these is just kind of make sure that it’s going to start this.
And so, I am going to go first with the simplicity of a variety of sizes. And then I think I will put just one star. I’m going to put it on the stark spot. Okay? I’m going to balance that over here, okay? Put a few dots here as if that one got messy. That’s nice. You can use your finger, take them off. It’s going to be like snowflakes. A little snowfall on my snow person here. You do not have to use black for the spirals. You don’t have to do the spirals. In fact, I think I’m going to do mine today in a navy blue. I have a navy blue. Here we go.
And I’m just going to, I usually do three. I accidentally, where’s that oven? I accidentally realized when I punched my hole at the top of this, but I lost a spiral. So, I’m going to go off and make it be a little bit cattywampus. I love the word cattywampus today I’m using it too much. So, we’re just going to spiral in, spiral in, do a different way. This one, I’m going to go ahead and do one more here. Might as well do one more here. Yeah, I think my snow girl is singing. So, she’s going to have some little musical notes in the air.
Optional, of course. And I do like to have my edges finished. So, either I would make another circle in a different color where I could put them together or what you’ll notice I like to do because I’ve done it on most of these. It’s just the little dashes. And I’m going to go ahead and do those in black. I just start here. And again, this is where that warmup and those circles and the lines on the face of the clock are nice to give you some practice with your fine motor skills. I hope you’re not losing them. Or if you have micrographia, this will help as you, I mean I hope you don’t want them so straight, but if you want them perfectly straight, you could take your little circle and do your dashes very neatly if you want them. Very neat.
Continue and you keep doing that while I get a joy break. Here’s our joy break jar. See what we can do and what’s just for thought. Okay, we don’t want to do this right now, but here’s a joy break for anyone with house plants. Take up to five minutes to 10 to them. Nip off dried-out buds or leaves and add water before you leave them until next time. House plant joy. Here’s one you see, walk your dog. Can’t do that one right now. Either call a friend you’ve not seen in months. All right, joy jar, give us something we can do, huh? Go to the park and swing. How long has it been since you were on a swing? Maybe you’ve got kids or grandkids. So, you have a swing set in the back. Now here’s one’s specific to the holidays. Turn on twinkle lights. Well, ooh, I bet we can do this. I just sucked. Sit still for two minutes and do nothing. Did you notice my little encounter with the truck door is almost outgrown? So, let’s just pause, kind of just look, maybe meditate on your little snowman, whether yours is a star or charcoal buttons or a red scarf or a green scarf or a blue scarf or whatever you did. And just do nothing. Just have a look and think how I want to finish this. But what would make me really like this little snowman, snow girl, they’re all different.
Notice today I really used an aqua blue instead of the regular blue. We don’t really have to go full two minutes, but we’ll come back to the joy jar, see if there’s more in there that we can do right now. Okay, so with your little snowman, maybe you finished. Take just a minute to finish up to the midnight. Get this going on a semi-hole punch. If you don’t have a hole punch, you can just use your scissors to cut a little slice here to hold a ribbon. I’m going to go right about there, and I have a little bit of ribbon here and you know, at this time of year, maybe you don’t have ribbon if ribbons not your thing. Well, you know, you might still have some hangers for your ornaments extras. So, let’s get one of these.
But you can have straight ones, green ones, silver ones, gold ones black ones. I like these cute little dudes. And you can hang it this way, you can hang it this way. You can put, I’m going to put ribbon on, then we’re going to go to our little chick. Here we go. Well, it’s a little bit wide. Let me, there we go. Lately, I have been painting rocks, making journals getting things ready for Christmas gifts. I like to make some wood projects. Don’t know what you have had time and interest in doing. I hope you’re doing something creative to enjoy. And especially when we’re gifting things, it’s nice when it’s handmade.
So, if we have a little, I didn’t make that bow very lovely, but it will work. And then we go, okay, need it right in front of me. Hang on. And I also want to show you how you can use these little guys for greeting cards. You know, that’s one of my favorite things. All right, so here’s our little snowman. going to hang it on the tree. Oh, too fun. Let’s talk about velum just briefly. I got some out it’s, here’s some here. It’s, nope, my velum disappeared, but I imagine you know what vellum is. And I wanted to just show you how to cut your circle. One of these let me see what my, here it’s, here are the things that you can use to fill your little snow globe. And it is just, it’s darling when you fill them, I don’t have it ready.
You can put the glitter in the center and then glue all the way around the edges and boy let it sit still. You can use a sewing machine and you can sew around here. You can use double-sided tape. That does show through the vellum pretty badly. I think. I don’t really like double-sided tape on these. They have what they call a velum tape, but no you can use sobriety things to paint on the snow globe or anything that is velum if you wanted to layer for a special effect. Let me see.
Like this guy I made today is pretty bright with that aqua. What if to tone it down? We put that one under velum actually because it’s brighter, it shows up better. I like that. That’s an interesting thought. Okay, so that is the son snowman or snow woman or girl or boy or whatever. And now let’s look at our little check. How are we going to draw our check? Now this one is more oval, but the good news is the little set even comes with ovals. So, I could put it like this. Don’t want it on here though. You can put it like this. And I can take my smallest blade and I can cut out. And this is a rock that I took a photo of and then printed it on watercolor paper. There are all sorts of ways you can do this. Have to admit, I’ve used these blades a lot in scrapbooking, so they’re getting just a wee bit doll at this time. Not a problem. I’m just going to use scissors to finish it. Let me show you how to draw this little chick. So, fun. I guess it’s a little chick elf. And of course, I was a little off-centered there, so I’d probably use something dark to go over it. But here, let’s draw this.
So, the first thing when I’m drawing this little one is I tend to start with the hat. So, I go ahead and if you want to make it smaller perhaps so I go ahead and get just the little base part started and you can do, you know, the little poly in berries if you wish. And then get this little line. You can come up and it is, you can make it as perfect or straight as you wish. I’d kind of like to make it just a little bit messy. Then this one’s going to come over toward that side. And then we come like this, just a little arch. going to make this a little bit bigger arch. Bring it down to it. You could do a little ball here. So, you could just do like this, or you could do just a little turn down if you wish. Then for the chick’s sweet little face, it’s just a little eye and a little eye. And those are pretty equal distance from here to here and here to here. And then those are a little closer.
And then the little nose is just a little like this. Get a little beat going here. You can be as straight or as not straight as you wish. I usually go about like that. Put little dots right there. And then the rest is almost like this little guy. We’re just going to tuck, and you can do this if you wish. You can do straights, you can, you know, however, you want to do that. So, I want rounder here. This is flatter oval. It’s all good. Coming out here to the little arm number one, coming over here for arm number two.
And then starting to get kind of where you want the little body to be. Whatever moves you just pretty fun. And then the legs are just too fun. Now if you don’t like it the way you first do it, just add a layer. That’s good. Okay, I want that be a little bit better. And when I color it, I can fix that. Then the legs are going to be like little knobby knees. Okay, look at that. Those lines are just perfect to be those little knobby meats. And then it’s kind of bow a smidge. Maybe this little chick rags, horses. I don’t know, reindeer, that’s what it writes. A little calf on that. Yeah.
And then the shoes are going to have little rolled socks. Yeah, then kind of like little elf look going on here. However bigger little new would like for these to be. We’re a little turned up. And again, I think because I did this on the hat, I go like that there. Okay, we’re going to get this little one here. You can strike these that way you can strike these this way. Don’t want to make that just a little bit longer. You might want to make this just a little bit longer. Little pink cheek coming up. And then when we’re coloring this one, I’m going to get, I really like the red hat myself. So, I’m going to stick with a red hat, but I do want some shaving. So, I’m picking three colors. Now, these are just regular-colored pencils. You could be using markers watercolor paint, acrylic paint. But I’m going to go with a little bit of a darker first.
And have you guys worked with blender pencils? Blender pencils are marvelous. Let me show you what a blender will do for your work. Okay, dark there and go to the next one. You can use lines, circles, whatever moves you. I’m working on this rough sheet. I forgot to get my smooth sheet there. It’s, I wondered why I had those marks. There we go. Oh yes. Much smoother. The surface below when you’re using pencils or what have you is pretty significant. Now let me show you how a blender works. Well, my blender is in need of sharpening, but it should work, and it will just say colorless blender. If you’ve never bought one before, it’ll say blender or colorless blender. But here, if you don’t like some of those marks from your pencils, all you have to do is blend. And it will also let you blend colors together. For example, if I want a dark street right about here, this will blend those together and you can use the blender once you have some color on it to actually, it’ll want to be a light layer typically, but, but it will move the color for you. Sometimes people like to hold their pencils this way to get a little better control. Just depends on what works for you. You can turn your paper. Of course, there are so many cute things. Gnomes are very popular, and a gnome is just too easy to draw. It’s great. But let me just finish this.
Okay, now a no, just as an aside would be a big nose. Usually, the hat that comes right over it, however tall you want to make it. And then of course the rest is a nice big beard. And then it might have little legs and feet. Depends on what you’re doing with your little dude, huh? I hadn’t thought about doing a gnome today. That’s fun, kind of make little wooden. If any of you are from Scandinavia, there’s a clumping. I think they call these big old wooden shoes. Clumping. We’re going to put little tassels on those like little elf shoes and you can do these out of belt, et cetera. You might do a little bit of this when you’re coloring the little beard. You can do different things. Ooh. And you can check her a little cap. So, then you could do it in, let’s say I what, let’s find black. So, if you want to check her, red and black, green, and black are just too much fun. I’m going to do green since we have green out.
And then if you feel like that green is too light, just give it a little overlay of your black or gray. And there you’ve got a lovely green and black chicken. So, you can just keep playing and have fun with these. Just quickly, let’s see if there’s a joy break we can do or that you could do when we leave. Ooh, we did this once the other day, maybe two months ago. Massage your hands. That’s always a good one. Something that kind of gives you that sensory feel. Have to love that. Okay, so we have a snowman chick. No, not a bonus. And on your little cards, let me find one.
Okay, let’s look at this little guy. Here is glitter glue because you know, glitter is doggone messy, right? Here it comes. This all delivered for you. And all you have to do is like if I wanted to make little glitter ends on these sparkly lights, that would be a fun way to brighten up the picture. So, you’ve got so many options, don’t let that overwhelm you. Just do what you want to do. Keep it simple by writing yourself a plan. This is what I will do. And don’t forget if you live near me or if wherever you are, kindness rocks. The winter ones are just so much fun to put out. So, this little guy, I saved him to show you, but he’s going to go outside in the next day or two. And then also one last thing. When you make, for example, this guy, the snow globe, right?
It’s going to be a greeting card. These are some I have in the works. And so, this is just a present. This was off of a greeting card I received, and I cut this little square out of the front of the card. Then I backed it on this dark green and backed it on some other Christmas paper. I put my little scatter joy stamp on the back. going to put a little Christmas saying inside. But this one is going to be a little tree in a jar. So that’s why I’ve got the little velum jar. Got a little bit of this up here. Now this one is going to be unknown in a snow globe once I get it all assembled. And so, by putting it on the front of the cart in this pocket, of course, imagine a hole with a ribbon. Then they get a little gift from me. And this little heart says, oh, joy All right. I shouldn’t be laughing. I just get kind of, I have too much fun with this. And here is another jar, not a snow globe, but a jar with a snowman. So, these are more colorful ways and more fancy ways that we can color these little guys. Notice that this one’s cap is down. That’s good. Big circle, big pink cheeks instead of a straight line. This one is dot, dot, dot, dot, dot options. Have to like it.
Melani Dizon (Director of Education and Content, Davis Phinney Foundation):
Well, thanks, Lorraine. Thank you everybody, and have a really, really great holiday season.
Show notes
We had a great time at this month’s Joy Break by doodling quotes and creating winter wonderlands. Here are some takeaways:
- Your lines and circles never have to be perfect. The point of these joy breaks is just to have fun and get your juices flowing. As Lorraine says, let it be a little “cattywampus” and let yourself create.
- While we created the first Winter Wonderland on paper, you can create these scenes on anything, using any materials. Lorraine showed us a similar scene on a rock and another that she is turning into an ornament. Use whatever mediums and canvases you want to create your winter wonderland.
- Try using different skills that you’ve learned in one project. Lorraine showcases mindful doodling, fancy lettering, and creating tags in this project. Make sure to visit our site to relearn these skills or see them for the first time. You can use as many or as few of these skills as you learn, but this joy break reminded us of those skills. Winter Wonderlands are a great way to showcase those new talents in one project.
- Lorraine had her snow people holding up “victory arms.” At the Davis Phinney Foundation, those arms mean a lot to us and remind us that every victory counts. These Joy Breaks have been a great reminder of that message, so we hope that by creating your own Every Victory Counts Snow Person, you can remind yourself of that message whenever you need it. If you are new to the Foundation or want to be reminded of our message, hear Davis tell his story here.
- As we wind down the year, we want to thank Lorraine for creating so many fun crafts with us this year! We had a great time learning from you and hope to share the joy with you again soon. Thank you!
mentioned materials
related resources
[Webinar Recording] Envelope Book with Tags: A Joy Break with Lorraine
[Webinar Recording] Lettering and Doodling: A Joy Break with Lorraine
 Join Our Peloton Club
Our educational content is made possible because of the monthly donors in our Peloton Club. Want to become a member and help us continue to create the resources people need to live well with Parkinson’s? Learn more and register to become a member here. (You’ll get a cool gift if you do!) It’s as easy as can be to set it and forget it.
about Lorraine
 Lorraine Wilson, a Davis Phinney Foundation Ambassador, was diagnosed with Parkinson’s in early 2017. Just a few months later, she assembled a multi-disciplinary team of colleagues at the university where she was teaching, and her personal and professional journeys joined forces. They began an exercise study with a fresh look at resistance training with instability and cadence walking. That was followed by a study of blood flow restriction used during resistance training. Lorraine helps facilitate the local support group. She knows that the support from family, friends, and others with Parkinson’s is critical to living well each day. Maintaining a positive outlook may not be easy, but it is a worthwhile effort that lends support to others, making life that much better. One of her favorite quotations is from Ralph Waldo Emerson, “Scatter joy!” She strives to do this in as many ways as possible every day. You can find some of Lorraine’s other work here.