During our monthly dose of joy in September, we practiced mindful drawing with Zentangle and slow drawing. Watch the video below to follow along. And, if you aren’t already registered for our monthly joy break, be sure to register today to be notified of all upcoming sessions and receive the recordings straight to your inbox.
To download the audio, click here.
Read the transcript below or click here to download.
Note: This is not a flawless word-for-word transcript, but it’s close.
Lorraine Wilson (Ambassador, Davis Phinney Foundation):
I like to just use paper and draw my squares on it. Whether it’s six on a full page, three on a half-page. And there’s nothing wrong with just using those to draw in. Now, you guys, I think, who have been around a while, know that I’m also kind of spoiled because one of my preferences is cut corners, curved corners, and I can show you how I do that quite easily when I trim this paper. So, I did trim some four by fours and I thought maybe being nice and large would be best for you guys to see clearly what I’m doing, but I’m going to go ahead and cut. This is just a Fiskars Cutter. Can’t see the top of it, unfortunately, but I’m going to go ahead and cut another four, four, but this if you have a cutter, it’s lovely.
If you don’t, of course, measuring using scissors is marvelous and you can buy these things. But you know, usually when you buy in like cuts to size, they’re more expensive. There’s no need to do that. So, there’s one with regular corners, correct? This is by creative memories. There are a lot of these things. You’ve seen this at least once before on these, but it really is that simple. And you get your corner. I just like that. It’s just my favorite thing. And that might be the influence of Zentangle because they mostly curve. So let me show you a few slow drawings and then start the one we’re going to do today. This is one of the most recent ones and the slow drawing sometimes does use watercolor or markers. These happen to be with watercolor. And it’s just piece by piece, repetitive size. Doesn’t matter.
You go medium, small, large, whatever you want to do. So, I did just a couple of those one day, just play. And then we are going to do something more like this, where you’re just using lines. And so here I’ve made basically a line that almost looks like a mountain from far away. And then when you take your lines and just keep being repetitive, this one to me became more bark-like, water-like, and again, you do not have to color these at all. Everything can stay this one’s a little bit bigger. So, you just see a little more drama. And this one, I love this. It’s just kind of, I guess I should go this way. because really what? To me, this looks like it’s on the east coast with the brakes they put on big sand dunes and then watering back down. If I wanted it this way, I guess that could represent sky.
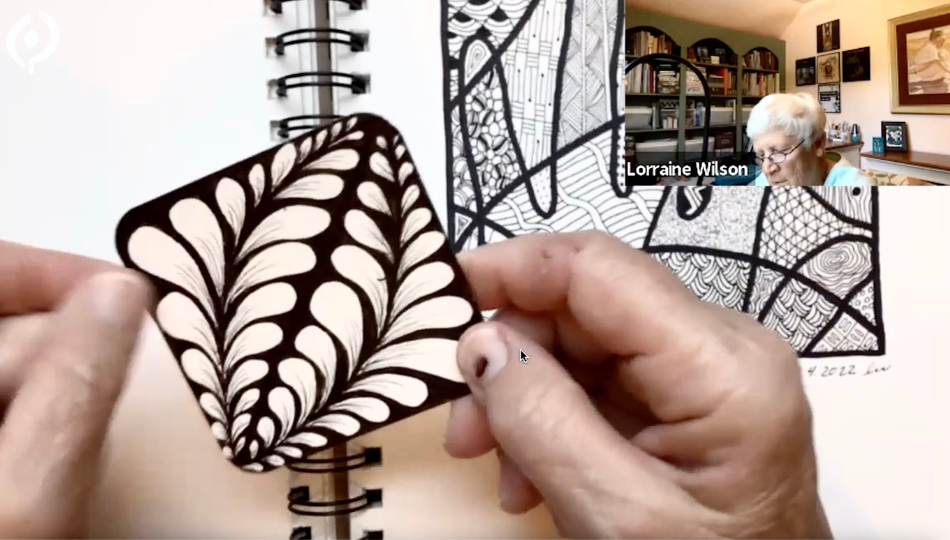
But seeing mindful drawing slow drawing is to take your time. There’s no rush. That’s a color. And what I really enjoy too, are those frames that have just a little clip on them. This one’s fun. Almost looks like leaves, parts of leaves. And then here’s the one we’re going to do today. Common. Now, one of the things Amy will say about mindful drawing is try not to think about a product at the end, but to enjoy the doing it of the process. And then if at the end you find, hey, if I color that a certain way, it’ll look like a cobble stone path. Or if I color it that way, like I could see if I did this particular one and I wanted it to be something, you know, a sincere product. If you will, I could always make this big blues meaning stream.
This could be cobbles as in a path over the stream, this could be grass or dirt or leaves and weeds. So, you can see here. I did actually start to do some coloring of a similar one, but let’s look at cobble and I’m using micron. I have an oh one and an oh three, not really much size difference in the two, but I’m going to take the oh three because I’m going to go kind of big. So, you guys can see it on screen. And this is a watercolor paper simply because I like the thickness. Some papers are smoother, one side rougher, another, and you know, you can also just use like I did on those others copy paper off your printer. And of course, that can be purchased in different ways. If you don’t want to use 18 or 20 by a little bit better, maybe 24, 26-pound paper. So, getting the handy dandy little micron ready and for slow drawing, it really is to put your pen down, draw what looks like a cobble to you. And she actually calls it cobble on purpose, not cobble stone, just to think we are carving or cobbling out. Although we are sketching an interesting shape, it can be like this. You can also, now, if you want to come separate way out here, no right? No wrong, no rule other than to enjoy and take your time.
Sometimes I try to stay equal, distant, like between, you know, the same little path between them. Sometimes I’m not too concerned about that. And I try to do a variety of sizes. Try to think about if I were in nature. And I were actually looking out at an area that had some rocks that reminded me of cobblestone, or I don’t know, maybe some of you may be fortunate enough to live in an area that has some old cobblestone street. We have some old brick streets around here. We don’t, and I’m getting a little, I’m going to move back over here and I’m going to slow down.
We then just kind of relax. I want to mention that if you are fortunate enough to have some kind of sketchbook that you like to fill, slow drawing in a sketchbook is fun. Because again, you can do this, just draw your square. You can even draw circles, whichever you like, and on the full page, or even just a half of the page, you can select one of the patterns, whether it’s a line pattern or Cobalt another one of my favorites, watch this. It’s called rice. Now again, if tremors interfering, make it a little bit bigger. Maybe your rice needs to be this big depend, a mag magnify scope, right?
You can be far away. You can get close, you can overlap. You pretend like you can do whatever you want. But here’s one thing I like to do with rice. I mean, that was rice. The one gets started. And then I just touch one little section and you can move your paper or your tile. If I can call it a tile and then you get some fun shapes, some interesting patterns. And to me, one thing about slow drawing is like looking at clouds outdoors. Do you see something in it? Like right now, when I look at that, I can see here the face of a little, yeah, looking at me little hair. So that is slow drawing. And I’m going to go ahead to the table of contents in this book, since it did arrive. And I had it to show you where you well, here on the cover, you can even see some of hers. Like this is very similar to the one I was showing you that I learned from her, of course, but draw yourself. Oh, there’s rice. Woohoo. Great. This is actually pieces squares. Can you see the edges that she’s put together to make a large drawing? So small art became big art. So here, see some of the first two I ever saw fan and cobble. And this one is lovely. I love that. It’s called exhale. So, I imagine push your inhale nose, exhale, mouth, inhale, mouth exhale, noses. I like mouth, nose, nose.
It’s really simple. But when you put them together, especially in a sketchbook and perhaps you get your watercolors out or your pencils you can just have a lot of fun with slow drawings. So, I highly recommend if you are on Facebook, feel free to go to mindful art studio. It’s called the mindful art studio. And so now we are going to move into something that I want you to be able to finish before we, we end today. But we’re going to look a couple examples so we can pick what we want to do. Okay. Well, you don’t need to see Facebook, but I do want to show you, here we go. This is one of my favorite Zentangle I get so caught up in the pattern. And then when it’s done, it’s like every time I think, how did I do that? And that’s where Zentangle really during the process.
It just puts a spark at being, boy. And this is always fun because you have a hand, I hope you have one hand at least, but here I’ve just used my hand. Now I went thicker on the outside with a Sharpie just because I wanted to be quite pronounced. I did this just the other day. Hadn’t done one in a while, but each pattern has a name and what I did this time though, because we were combining slow drawing with Zentangle. This one right here, this is actually a slow drawing pattern from Amy as is this, and then what I’ve noticed in the last year or so some of the untangled patterns are picking up very similarly to what Amy does and, or I think it’s all just going full circle in that if you see a pattern and you see what I did on my thumb right here.
Yeah. That was fun. This is course like a basket lead. So, we are going to look at the basics of Zentangle and then we are going to do whatever you want. Oh. And by the way, any of this art can be done on other colors of paper. I tend to use white or cream, but craft paper is a brown and this is black paper. And you’ll notice that this is somewhat similar to that other one, not quite, but you’re seeing, I’m kind of using a pattern right there. And then this one, I was actually using a pink metallic or a kind of a rose-colored metal talent to do this one. So, what are the steps in Zentangle if you have a piece of paper where you can just draw some squares and they don’t have to be good squares. I mean, if you want to, you could just do this square.
Yeah. Just kind of get an idea. And I’m going to show you the steps to the actual Zentangle. I’ve done them on I think eight different cards because it’s it tends to be an eight-step process. So, here’s step number one. Are you ready? And what I love about this too was Zentangle the process is patterned so that you don’t even have to think if you don’t want to. In fact, there’s a dye with, I don’t know, 12 sides on it and one list of 12 Zentangle patterns. So, if you don’t even want to sync or pick a pattern, roll the dye. If eight pops up, you go to pattern number eight and that’s the one you’re going to use. Roll the dye again for the next one. Another pattern numbers. Let’s say three you’re again, best pattern you’re going to use. So, here’s step one. You take your paper.
And this is usually done in pencil pencils used for a couple things and then the marker will be used for everything else. And you just find four corners. Now does it have to be exactly equipped distant from the corners. No, that’s the fun of I’m going to call it mindful drawing because that’s going to fit both slow drawing and Zentangle. But if I were using this, if this represented the first step 1, 2, 3, 4, typically I do it in pencil because if I want to erase it later, I can. But often I here am step two. Now I hope you can do this. Better. Pay attention.
The dot here’s what’s fun about connecting the dots. Okay? So, we have our dots. Sometimes you might be thinking, well, I need to be equidistant. Nope. Look at this. You notice that right there. You can squiggle it. You can do anything you want. You can be pretty straight. You get to decide, but you are now looking at like a mat around and then an inner area. Then there’s two phrases. They use string and tangle. Okay. So, a string is now going to give you your parameters, your boundaries, your limited, you know, framing your art. Now, interestingly, when you do, Zentangle inspired art, the shape of your animal or the shape of my hand, that’s the string, the equivalent of the string. And then you just like on the bird, you know, where I chose to make a line there and align there. And you know, that’s like mimicking the layers of the feathering down the breaths, the tail on the sea horse.
I’ve done it two ways. This seahorse, you can see, I made four of these. I kind of patterned this like that. And then when I did this sea horse, I wanted something different. And so, I did this separately. Whereas you know, on this one, I didn’t. So, you get to make your own little, I’m going to say equivalent of strings if you will. So, here’s an easy string wipe. This, you just go back here. 1, 2, 3 voila. Now I have 1, 2, 3, 4, I’m going to use four Zentangle patterns of my choosing and all of these patterns have names. I rarely worry about the names I wrote them down for you just in case. So, the first pattern I chose to use was called floating discs. Let me show you how they do that one.
Go back to my I’ll have to. So, if I put in 1, 2, 3, 4 might get my lines. Then there’s no rhyme or reason. Sometimes I just make the square. Sometimes I like to I’m do this on the, okay, I’m going to make that the top. And then here we go. 1, 2, 3. Okay. So floating discs. I’m putting it here step by step. I like to start where there’s a nice big space so I can see what’s happening with this path. So, I am going to go out and back. Okay. Leave a little bit of space. So that looks like half a shark smile. Where’s the teeth. So, shark. No, I’m one of those people that kind of talk then I have to finish. Okay. This goes here. I have to imagine where this one is. And sometimes when I want to do that, I will put it on paper and I will say, well, this one is going to go from here to here and it would go, right? So, then the next one is going to go here and the next one is going to go here course. Now I’ve got none in my edges, but that’s, we won’t work about that. What’s next. We’re going to have a solid piece in here.
And sometimes this is where it’s an advantage to have more than one or two pens because I can actually use a thicker pen to fill in this solid space. But I didn’t bring any other pens, but my one and my three, for sure, I’m using my one color, the three. Well, I’m going to draw all these and I’m going to keep these somewhat in a shape that I like. I mean a curve that I like to go with that you do whatever works for you, because it’s yours and that isn’t going to have this part of the pattern.
So, we’ll color that if you were using paint and wanted two, you could actually be painting this solid black instead of using your micron or whatever pen you may be using a pencil right now to practice. You may be using a ballpoint or gel pen. All is good, but even the way you choose to color, like I might go straight, straight, straight curve straight. You can fill it in however you want. I think that’s about all the solid I need. Take that a little still. Don’t like that. Now you get to decide what you like. Okay. There we go. And then what you’ll notice. It’s just these lines. Okay? That’s all you have to do next. So, I’m actually going to go here again. If you want to, you can keep your line very similar, but then I notice how I tend to follow the curve.
What if I don’t want to follow the curve is intent is normally this is a straighter pattern. I’m going to just do one at a time. You can do that if you want and keep coming and it’s going to be curved. So instead of being all these straight lines, it’s going to be curved perfectly good. Not the pattern in its purest form. I just to show you, I’m trying to equal distance these, but you know, it’s all in your eyes. It’s all in how you can do it. If you end up with something that has a bigger space, it’s okay. If you end up with a smaller space, it’s okay.
Yeah. But now see, we’re starting to share more and more of now we’re starting to show a little more about the first pieces that we drew this shape, this calling back the side of the disc. I think we’re looking at it from the side, not the top. Now in mindful drawings, slow drawing. I would try to do these very slowly and deliberately, very slowly and deliberately with entangle. You can go to speed that you’re comfortable with. Now. One of the important things about both of slow drying, hands entangle, and the reason I really appreciate them is there’s never a mistake. If you go, oh no, I made a mistake. Maybe you, maybe you went over the line. Well guess what? Maybe you can work that into your pattern and it’s not a mistake at all, but you’re going to do this now. One, two down one, two down.
So, if you’re going to change your pattern now one, two down, one, two, don’t have it down then you probably, I would anyway, I’d be going up here. One, two down, one, two down, one, two down and I would go ahead, and you know, make it my pattern. So now I’m not doing floating discs. I’m doing Lorraine’s version floating discs because there are no errors. Love that mindset. I tend to be. Yeah. We bit particular about things and I’m, you know, at my age, I’m trying to learn not to let that inhibit me or stop me from doing anything. You know, there is also a very practical reason, friends for these, for full of dots. When you look at this, some people get this, like, I don’t know how to start. What do I do? I don’t know what I want to draw. I do if I want to, if I, what I want to well to get over that, it’s kind of like freezing for anybody that freezes.
When they walk by starting with four dots, it’s no longer a white piece of paper staring back at you. It’s four dots. And so, you can get started. It’s really funny. Okay. Now you might finish that. You might not finish that. Here is one of my favorites. I, no, I call it basketball, but that’s not their official net. They call it Kikoi, but it kind of looks like the basket weave to meet. I don’t know about you, but it’s a, it’s a series of four. I’m going to do a little bit bigger. So, I’m going to go 1, 2, 3, 4. You find whatever proportion works for the size dis paper. You’re using two but two, three or 3, 4, 4. These are square though. They aren’t rectangle. You can do rectangles. What am I saying? You can do anything, but in pure, pure Zentangle is a square. And they’re call, they call this a tile in Zentangle and if you actually buy Zentangle tiles on the back, there’s a line for you to put your name, to put the date that you did this. I mean, it’s really kind of fun. Now. We’re going to go this way. We’re going to have just slight curve to it again. I’m keeping a little bit equidistant, 1, 2, 3, 4.
And just by drawing these lovely, I didn’t quite make those touch, which one? Maybe better attach, but you know, it’s okay. Yeah. I get a little bit mess if I try to get too fast and always, I have to admit when I’m not working with you on screen, I tend to be much neither. Otherwise, I wouldn’t be able to get these okay. So just in case, maybe do a little bit more here just for the idea, but I’m sure, you know, I have a finished product when we get there now, any quilters, I don’t know if any of your quilters, but you’re going to love this. I think doesn’t that look familiar flying geese. I believe that that’s a quilt pattern. May not look like this, but here’s what we do. I love this curve and I am actually going to follow it. This is a great place to put flying geeks. So, pick your distance like this one. What? Maybe that’s three eights. I’m going to go a little bit bigger over here simply because my tile is bigger and it’s faster if you do it bigger. So, there’s that. And then notice my other line is going to go this way.
Okay? So flying geese, we’re going from the bottom left of any of these. Well, it’s not quite a square. This square-is shape to the top center and back here. No, sometimes you can just go one, two and be done with it. If you want more curve there. Sometimes I prefer to start at the top center, come down to the corner top center, come down to the corner. Now you can also go from the corner up and the corner up, you do what for you and then of where you don’t have a full square, you’re where it would be. So, I’m going to imagine it goes up and the rest of it’s over here somewhere. So that’s all I can do is up.
So, there it is plain, and you can leave it plain. Should you ever want to, you could perhaps fill this in with a shape. I like to go ahead and color it. It’s going to gimme a little bit of, again, you can use colored pencils. You can use watercolor, but I would say in its purest form, it tends to just all be colored your marker. And again, these microns, I’m sure you well know or any other brand. They come in 01, 02, 03, 05, 08, 10, 12. And the larger ones do fill it in better. I think now for time’s sake, I think we’re doing well. But when we finish this practice, I want to help you get started with something that you might finish on your own. If you’re interested and you might be putting it in chat, if you want to see how to do like we could do to it, we could do your hand.
We could do the seahorse we could do. Maybe we do anything you want. Depends on what you asked me to do. Hey, there is nothing wrong. Let’s say you want to do Zentangle in the shape of a butterfly and you say yourself, oh man, I’m not very good at drawing butterflies. You know what it is? Permissible. If you need permission, it is delightful. It is perfectly. Okay. So even like going to a magazine page and if they’ve got a butterfly or if you have a kid’s color book or your own adult coloring book, or if you’ve got some kind of butterfly on a greeting card that you say, hey, cut out the butterfly, trace it, string it. And then these patterns are all called Tangles thus Zentangle. Now, you know when you were a kid, what do we call it? Doodles. Didn’t you didn’t you doodle on your notes in eighth grade.
Math grade is when I started writing backwards. I loved anything Leonard and I loved architecture. And so, I would kind of incorporate all that if I could. And doodle, well Zentangle, I guess you could say is a grown-up doodling or fancy. I don’t know what you want to call it, but it is what it is. And really Maria what’s her last thing. Me, two people, Maria, and somebody. Sorry, I can’t remember moment Zentangle, and I do have, I have to admit I’ve loved Zentangle many years and I have, I don’t know, 12 books about Zentangle maybe more. One of them is of course the joy of Zentangle love it. But there you get that pattern. Okay. And then another one of my favorites, of course, I’m bringing you my favorites. That’s that way I know how to do them. This is called cadence and it has a variety.
This one is with black circles. See, they’re just black. Let me show you how we do those, but I’m going to do them in this style, open circles. Okay. Now I’m going to come over here because that’s kind of a nice line to get myself started and I’m going to go here, and I want that distance and that distance to be about same. There, there, there. So, I’ve made a line. Okay. Now I’m going to turn it this way so I can come up from those. And I’m going to try to be, please, if you want to and need to, you can get room, makes it take longer and you want it to be more perfect. You go for it. I don’t want to do that right now. You know, if these were going to be on an architectural plan for bolts and a steel being, yeah, you probably better have that rule course.
Everything’s done on CAD now or whatever fancy computer software that is. there is very few hand-blueprints these days. That went up a little bit, you know, they say you’re an optimist. If you go up, pessimist, if you go down, eh, I just go cattywampus this, what does that mean? I know cattywampus is okay. So, these are going to be all of these intersections. How do we get the shape? It’s a lazy S so I’m just going to start right here in the center for you. And I never start where there’s going to be half. I always start where there’s a full pad. So, you start right here, you see, and you kind of go around and then cross over in the middle and around. And it looks like something on a Strata violin. Doesn’t it. If I need a one on the other side to make it be where the music, the sound comes out. Yeah.
So, you just take your pattern back. And I go to this side, and I get these done. Yeah. I was a little crooked, but you know, there are hundreds, hundreds, I don’t know. Maybe thousands of patterns people have made their own patterns. Rick, I think it’s Maria and Rick. And sometimes I do this a little longer than others. Now I’m going to go up here. If I imagine that my, my circle would be right there. I’m going to come right about there to get that top part. Yeah. That’s this one should be about there, but over here, I’m not sure yet. And then here’s how you go the other way. It’s really unattractive like that. Maybe not unattractive. It’s not my, but now look, what happens when you start doing this? I, and this is where in my mind being purposeful, mindful, slow, you get to really enjoy theory of your drawing. As you go through process.
Now, Zentangle, true Zentangle. Once you finish something, uses pencil to shadow to give it some shading, to give it some dimension. And with some patterns that’s really critical with other patterns. It’s not typically it does make it. So, there’s our four segments. And that would be a true Zentangle here. I did one a little differently. So, I used this pattern, this pattern, this pattern, but this one, you guys remember neuro graphic art. I go, you know, if we can combine slow drawing, mindful drawing with Zentangle, you know what? We can add neuro graphic art. My brain’s one of those without dopamine or losing it. And here you can see the shading just a little bit and how that just kind of changes it. So, I chat on this. There’s some chat, anybody have an opinion on what we want to do. Oh, goodie. Lots of people say hello. Oh, Bob, Kathy. Kathy’s here from Rochester. Yay.
Why don’t we get a clean square? And let me show you how to do this one. Is that okay, everybody, I guess you can’t talk to me. All right. Now, this one’s different because we don’t do the purse tangle. We’re not going to do the four dots. We’re not going to do the border or outline. What’re going to call this spring that we’re not going to do a string per se. We are going to do a string. I should. And, but our we’re not really tangling with patterning. And of course, I don’t have a big fat pen, but we’re going to be able to do this. So, we start right here. Here’s one of the patterns. Let me show you from here to there. That’s one line. Okay. So, let’s make that one. What I like to do is kind of visualize this halfway down and I just put a little dot right there. I’m going to try to get near that. As I make this little ellipse or football shape, I’m going to turn it over. And if I was that far, I’m going to try to be, you know, somewhat similar going back. And so, I’m going to go and there’s that shape. Okay.
Now you can draw a line from here to there. And I will say some friends of mine when I was showing them how to do this. Once they liked afterward, they did it again. And they preferred this center line. First. It helps them then do these football shapes if you will. OK. So, let’s go inside. Tends to be a little bit easier for many people if we start inside. So, what we’re going to do is just start little and make that shape, this shape. What do we call that shape? It’s almost like we were doing the Paisley in the sixties. You have curve. Can we get the edge, this bigger, smaller. It depends on your paper size.
So, I am going to get my shapes in. So, I use this and here’s, what’s nice. This line is really just giving me a reference. It’s going to end up being all colored. So sounds good. Okay. So, I’m going to go up, try to get near that line. Come in up. Notice how it’s getting large. Each time that didn’t get as close as I would like. It’s okay. I can fix that when I move on, but I want to get relatively close to this center line. If I am far apart, this is going to be super fat. You don’t want that be too, too fat. So, we keep going.
Yeah. The inside of these is now limited by my pen, but the outside is not yet limited. Now, once we get about here, we need to start getting smaller again, obviously, because our space is smaller. And I do not know about you. And I do not know about lefthanded people, but there’s one direction making these that is far easier for me than the other direction. Okay. So, there’s this row, this row now I’m sure you can tell. We’re going to go to the, and you try to start where you were. Okay. And I mean, you’re not matching perfectly try to make about that size shape. Not like to kind of see where I am in the thought of, well, what’s happening over here on this side. I already did so that I can do somewhat akin.
You know, I could have taken that to be a little bit bigger going out into this corner. Didn’t quite get there. That’s okay. And if one continuous line, this isn’t your it’s okay. Go like this. Get that nice shape on there. Come into here. Feel free to not do it in one continuous line. If that at this stage is not comfortable. Okay. Now let’s work with this half based on time. We have about 10 minutes and that’s okay, but let’s work with this half and it’s going to be obviously the same over here. Or you going to go this way. So, what do we do? Well, believe it or not, it’s this simple, you start shaving. And if you have a fatter, thin or pencil, or if you have watercolor acrylic paint, but what amazes me every time I make this, and sometimes I’m better than others. This is the first time I have tried it on a form before. And this does not have to be perfect because when I am over here and I start going that way you come down here and show you if I come right here and I get this one in and this one in, okay, and I’m coloring. And I’m thinking, well, I have to be perfect on this side. No, because it’s going to go to that side.
That is all right, depending on the paper you are using scratch as well. The marker size, but you might be able to, as I can hear every stroke, I can hear those strokes and I can go scribble. That sounds like one thing. And I can go 1, 2, 3, 4, 5. I just, I can also crosshatch. I can circle, but if I circle, I do want to come back over it plain, because the circles will leave. At least my experience has been and see right here that maybe doesn’t look what I would like. Well, all you do is come back and fix. Fix is not the right word change. Hmm. No right or wrong. So, we’re not fixing, but I can change this shape if I didn’t quite get that arch, I want right there.
No mistakes modify as you so choose knowing that it’s your picture. And I actually want to make this come in a little there we, yeah. So slow drawing lines, circles shapes. Zentangle she calls the, we would say doodles, but they are Tans the Zen really does mean, you know, the mindful practice of Zen. So, for physical activity, I think lots are yoga for sketching. I think of mindfulness relaxation. So, it won’t be relaxing if you think it has to be. Oh, so perfect. Now what you’ll notice is I’m going to finish this area and then show you the last step just in case. And I know I’m not going to finish when we, this is a bigger picture. I’m not going to finish small. Okay. So, if I get this much done, how do I make it look like this? What, what do we do here in the center? Two ways to do that. I’m going to go back to a smaller pen actually.
So let me start up here. Okay. You can just go 1, 2, 3, if you just want to have three. So, it’d be like a center right left. Or you come down here where you can be C you can go longer. Not quite as long, not quite as long you can do many of these. I recommend an odd number. Just seems to be better to have 7, 5, 3. But if I wanted three in this big one, I could go 1, 2, 3, and by throwing it at the end. So, if I’m deliberate placement here and deliberate placement here. Okay. But if I’m deliberate here and go, I get a nice, smooth ending. So, you might keep drawing, but I just remembered how can I forget our joy break job? And we have like five minutes, I think. But the good news is today because I knew I’d get so concentrating on these images.
I kind of planted my joy break for fun. Have you guys seen the new shell Silverstein postage stamps again, I’m a card writer. So right here. Yes. Yeah. I rigged it. Read a poem, but because of those shell Silverstein stamps with it’s the giving tree, you know the green cover on the book with the kid at the apple, I went and got one of my shell Silverstein poetry books. So, you keep drawing and I’m going to read you out. We have several just mine says we have six more minutes that, oh, here you put something in. You ready for some joy? Here we go. Draw a crazy picture. Write a nutty poem, sing a mumble gumbo song whistle through your comb. Do ay goony dance across the kitchen floor. Put something silly in the world that isn’t been there before. I think with our little joy breaks similarly.
Oh, here we go. Sometimes I watch families like at a restaurant or when we’re on vacation, we’re on the beach or what have you. And every member of the family is on a screen. You know a device. I love this one. It’s called channels channel. One’s no fun. Channel two is just news. Channel three is hard to see. Channel four is just aboard. Channel five is all drive channel six needs to be fixed. Channel seven and eight, just old Louis. And that’s a great channel. Nine is a waste of my time. Channel 10 is off my child. Wouldn’t you like to talk a while? yeah, the little boy and the old man, this reminds me of the giving tree said the little boy sometimes I’ve my spoon said the little old man. I do that too. The little boy whispered I wet my pants.
I do that too left. The old man said the little boy. I often cry the old man. Nodded so do I, but worst of all said the boy, it seems grownups don’t pay attention to me. And he felt the warmth of Aled old hand. I know what you mean. Says the little old me pull sickle. Yep. Got time. If you add sickle to your pop, would he become a Popsicle? Would a Mo become a mole? Would a cop become a cop tickle? Would a chop become a chop? Would a drop become a drop? Would a hop become a Popsicle? I guess it’s time to stop or is it time to stop? Hey, I can’t stop. Oh, my will I half sickle twos toxic like forever. Read that one the other day he, we want ahead and let Mel talk to us. Let me unshared stop. There’s Mel.
Melani Dizon (Director of Education, Davis Phinney Foundation):
Hello? That was a good one. And I didn’t hear that. That was a great poem. I have not heard that yet. So, fun. Yes, Mike, we do these on the first Wednesday of every month. So, we hope to have you back here. This was great. I love Zentangle. Oh yeah. It’s very therapeutic. Thank you so much, Lorraine for doing this for us as always. And we will share the recording so you guys can have a Zentangle afternoon whenever you so choose.
Lorraine Wilson
Right. And I’ll say this too. One of my favorite things about these, what I’m going to call small art, the two by 2, 3, 3, 4, 4. You know, you can take it anywhere. It’s not like you have to take your journal. So, you’re going to go to like here, it would be like the cable company. You’re going to wait a while or maybe a doctor’s office. You’re going to wait a while. It’s just nice to doodle. So, whether it’s a mindful, slow drawing or actuals entangle where Zentangle inspired art, it’s just, it’s rewarding. And I can’t tell you how many flights I’ve taken, where I’ll Zentangle while I’m sitting on the plane and typically one person at least is going to say something well, at the end of the flight, they get it. It’s theirs.
Melani Dizon:
Aw, that’s cute. I love that
Lorraine Wilson
One long flight. I did a giraffe long flight.
Melani Dizon: Oh.
Lorraine Wilson
And I thought, I don’t know if I want to give this away, but they commented. They got thee
Melani Dizon:
Oh, wow. That’s very generous. That’s good.
Lorraine Wilson It’s fun.
Melani Dizon:
That’s good. Well, I’m sure it makes people’s stays. I have all of your drawings around me. They make me happy.
Lorraine Wilson Oh, good. And
Melani Dizon:
Yeah, fun. Lauren actually made me a book. I don’t is it on our list? It’s one of the,
Lorraine Wilson
We’re going to do accordion books, but not the journal making because that’s really complex. Yeah.
Melani Dizon:
But we decided to make it our lessons book for our family. And so, anytime you learn a lesson, so you write it in the book and it’s really funny. Some of them have, have been really funny and we love it. It’s great. It stays out so that you learn something, you write it down. Oh,
Lorraine Wilson
I love that. That’s just a wonderful application.
Melani Dizon:
It’s fun. It’s fun. Alright. Well, thank you so much, everybody for joining us for the joy break and we hope to see you next month. Thank you Lorraine. Bye everybody. Bye.
Show notes
We had a great time at this month’s Joy Break with mindful drawing, Zentangles, and slow drawing. Here are some takeaways:
- Nothing has to be perfect. Lorraine reminded us that we do not have to have equidistant lines, there are no “right” markers, and we don’t have to just follow along. Art is about self-expression and making sure we do what we can. You don’t have to be perfect in art, you just have to be you.
- One of the best parts of art is that, as we work, we are making ourselves happy. While Parkinson’s obviously makes dopamine production difficult for the body, endorphins help; therefore, art is a great way to help make those endorphins.
- Draw with your breath. Create small circles as you inhale and get larger as you exhale. Draw in the curve of your inhales. Be as mindful of your breaths as you are of your art, and simply be in it.
- Don’t get caught up in patterns and examples. Focus on feelings. Focus on your mindfulness. Get caught up in your own work, not the work of others.
mentioned materials
related resources
[Webinar Recording] Envelope Book with Tags: A Joy Break with Lorraine
[Webinar Recording] Lettering and Doodling: A Joy Break with Lorraine
about Lorraine
 Lorraine Wilson, a Davis Phinney Foundation Ambassador, was diagnosed with Parkinson’s in early 2017. Just a few months later, she assembled a multi-disciplinary team of colleagues at the university where she was teaching, and her personal and professional journeys joined forces. They began an exercise study with a fresh look at resistance training with instability and cadence walking. That was followed by a study of blood flow restriction used during resistance training. Lorraine helps facilitate the local support group. She knows that the support from family, friends, and others with Parkinson’s is critical to living well each day. Maintaining a positive outlook may not be easy, but it is a worthwhile effort that lends support to others, making life that much better. One of her favorite quotations is from Ralph Waldo Emerson, “Scatter joy!” She strives to do this in as many ways as possible every day. You can find some of Lorraine’s other work here.


