Written by Dr. Sarah King, PT, DPT
Yesterday we focused on spinal flexibility and the importance of making sure your joints are in proper alignment.
Today our focus is on the pelvic floor and deep core strength.
Download this checklist to help you keep track of your core exercise routine.
Download the pdf of day two exercises here.
CORE STRENGTHENING EXERCISES FOR PARKINSON’S – PART 2 OF 4
Day 2 Focus: Pelvic Floor & the Deep Core Strength
All too often our six-pack muscles get all the glory when we talk about core muscles.
However, some of the most important core muscles you have are hidden from view.
Underneath your rectus abdominis (aka. your six-pack muscle) and obliques, lies your transverse abdominis and your pelvic floor.
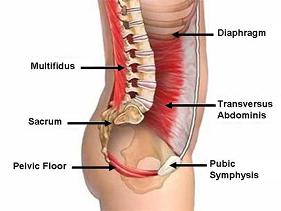
Your transverse abdominis acts as your body’s natural corset. It wraps from one side of your spine, around your belly, and back to the other side of your spine. Any time you pull your belly button inward, you’re activating your transverse abdominis.
Your pelvic floor is the magical muscle group that prevents all your organs from falling right out the bottom of your body. It contracts and relaxes when you use the restroom.
These two muscles work together with the rest of your core to stabilize and support the spine.
During day 2 of our Parkinson’s Core Strength Exercise Mini-Series, we’ll focus on activating these two important muscles. Each exercise builds on the next so once you’ve mastered Exercise #1 you’ll need to use it in the following exercises for best results.
Perform daily for best results.
If you’d like to download the exercises in PDF form, they are available for free download here.
| DISCLAIMER: Always consult your physician before beginning any exercise program. This general information is not intended to replace your healthcare professional. Consult with your physical therapist and healthcare team to design an appropriate exercise prescription. If you experience any pain or difficulty with these exercises, stop and consult your healthcare provider. |
Exercise 1: Pelvic Tilts
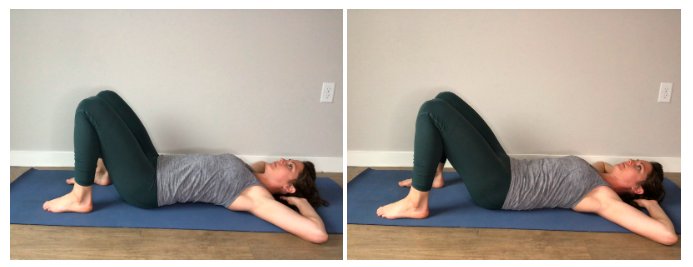
STARTING POSITION: Lying on your back, knees bent with feet flat on the floor. Place your hands behind your head or down by your side. You can use a pillow if necessary.
- In a relaxed position, feel how your ribs naturally flare out, your belly button pushes forward, and your low back comes off the floor. Your pubic bone will tilt away from your ribs.
- Pull your belly button in and up (like you’re trying to hold your bladder), knit your ribs together so they no longer flare out, and then try and flatten your lower back against the mat. Your pubic bone should tilt up toward your ribs.
This movement can be challenging to do, so let’s take a closer look:
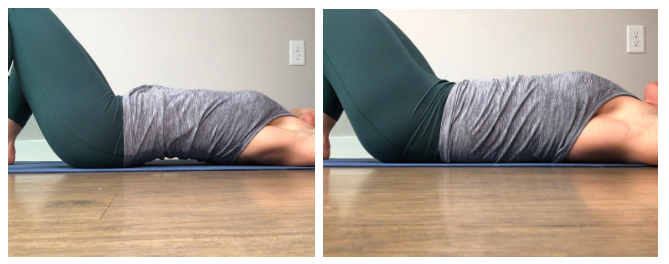
Notice how the space under your lower back should disappear when you’re contracting your abdominals.
Alternate between relaxed and contracted (#1 and #2 above) 20 times.
Rest and repeat for 3 rounds.
Exercise 1: Heel Drops

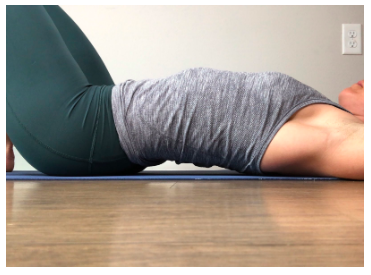
STARTING POSITION: Lying flat on your back and perform a Pelvic Tilt (previous exercise): Pull your belly button in and up (like you’re trying to hold your bladder), knit your ribs together so they no longer flare out, and then try and flatten your lower back against the mat. Your pubic bone should tilt up toward your ribs.
- Keeping your back flat, raise your legs so your knees are at 90 degrees. Raise your arms straight above your shoulders.
- Slowly lower your left heel towards the mat, maintaining your Pelvic Tilt.
- Raise your left leg back up to the starting position.
- Slowly lower your right heel towards the mat, maintaining your Pelvic Tilt.
Repeat 10 times per leg.
Rest and repeat for 2 rounds.
Make sure you AVOID arching your lower back at any point during this exercise:
Exercise 3: Bridge (Beginner)
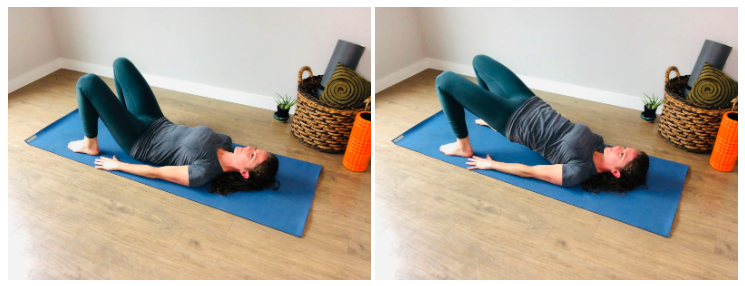
STARTING POSITION: Lying on your back.
- Bring your feet under your ankles, knees bent. Place your hands flat on the floor, palms down.
- Perform a Pelvic Tilt (Exercise #1). Then, slowly roll your hips up off the mat starting with your tailbone. Squeeze your bum, and push down through your heels. Let your lower back relax.
Slowly roll down and repeat 15-20 times.
Make sure to perform a Pelvic Tilt at the beginning of every repetition.
Rest and repeat for 3 rounds.
Exercise 3: Bridge (Intermediate)
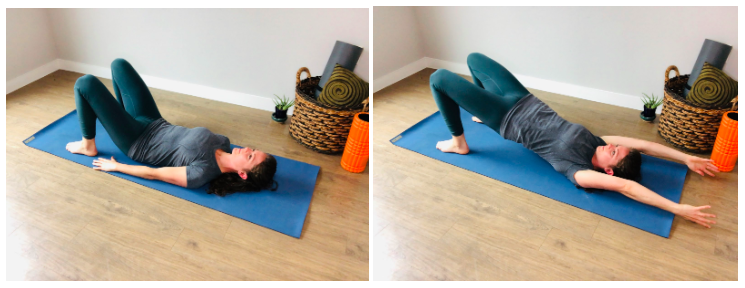
STARTING POSITION: Lying on your back.
- Bring your feet under your ankles, knees bent. Place your hands flat on the floor, palms down.
- Perform a Pelvic Tilt (Exercise #1). Then, slowly roll your hips up off the mat starting with your tailbone. Squeeze your bum, and push down through your heels. Let your lower back relax. Simultaneously raise your arms over your head, aiming to touch the floor with your thumbs. Keep your elbows straight.
Slowly roll down and repeat 15-20 times.
Make sure to perform a Pelvic Tilt at the beginning of every repetition!
Rest and repeat for 3 rounds.
We’ll be back tomorrow for part three of the mini-series.
About Dr. Sarah King, PT, DPT
 Sarah is a passionate Parkinson’s advocate who founded Invigorate Physical Therapy & Wellness, an online wellness practice 100% specialized in Parkinson’s disease, to help her clients get out of overwhelm and into action by connecting them with the tools and support they need to thrive over the course of their Parkinson’s journey. She lives in Austin, Texas with her husband (and favorite human), Matt.
Want the Full Series?
Day1: Spinal Flexibility
Day 2: Pelvic Floor and Deep Abdominal Strength
Day 3: Abdominal, Lumbar, and Hip Strength
Day 4: Coordination


