Written by Dr. Sarah King, PT, DPT
“You need to focus on your core!”
This buzz word – “the core” – exploded in the late 80s (anyone remember the Abdominizer?) and infomercials have taken the term and run with it, making billions of dollars in the process.
Contrary to popular belief, and to the detriment of ab products everywhere, you don’t have to have a six-pack (or even a two-pack!) to have great core strength.
But what exactly does it mean to have a “strong core”?
And why is it important for someone with a Parkinson’s diagnosis?
In this four-part mini-series, we’re going to discuss what your “core” is, why it matters and guide you through a series of exercises that will help you build one that is flexible, strong and coordinated.
What is “Core Strength”?
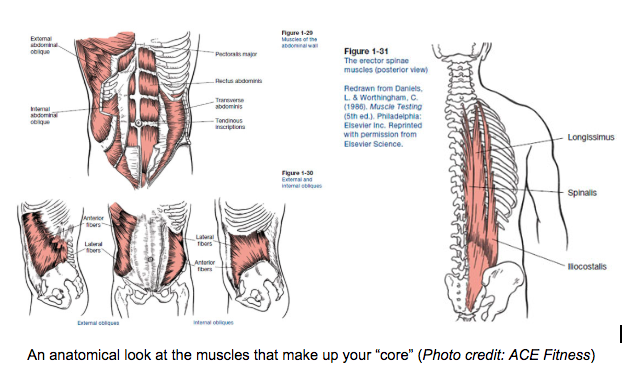
The “core” is made up of the major muscle groups that move, support and stabilize your spine.
Any time you bend forward, backward, to the side or twist, you’re using more than a few of your 35+ core muscles that wrap around the front, sides and back of your torso and hips.
You use your core in almost every activity you do throughout the day unless you’re laying flat on your back and not moving. You’re engaging your core to some degree every time you turn over, stand up, walk, reach, lift and breathe.
The degree to which your core muscles are able to control the movements you do throughout the day is considered your core strength.
There are four things you need to have in order to have a solid core:
- A flexible spine
- Activated pelvic floor and deep abdominal musculature
- Strong abdominal, lumbar and hip muscles
- The ability to effectively coordinate all of the above
Why is Core Strength Important?
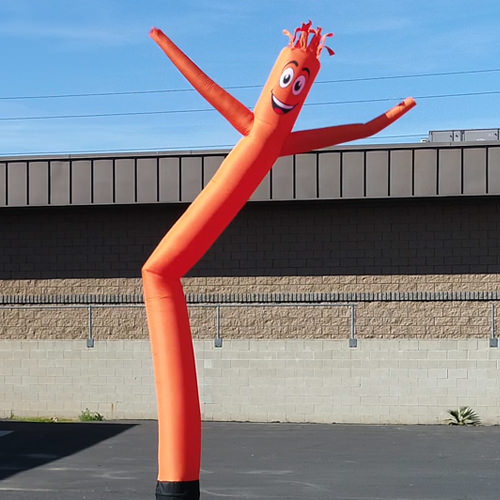 Without core muscles to hold you up, you’d move around like the Tube Man.
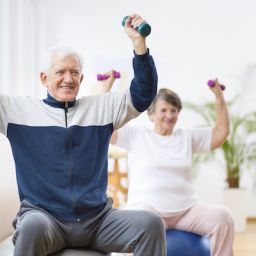
When the muscles that make up your core are strong and work well together, everyday tasks get much easier:
- Rolling around in bed
- Getting out of bed
- Standing up from a chair
- Lifting groceries
- Hiking on uneven terrain
- Carrying grandkids
- Getting on and off the floor
In addition, core stability training has been shown to improve low back pain.
While a complete and balanced Parkinson’s exercise program goes beyond exercises focused on the core musculature, adding some of these exercises to your regular rotation can be beneficial in many ways.
How to Use this Mini-Series
This four-part series is designed to help you lay a foundation of core strength with exercises that not only build a stronger core, but also help improve some symptoms specific to Parkinson’s including posture, stiffness and rigidity.
Each day we’ll focus on a different aspect of core strength and stability:
Day1: Spinal Flexibility (below)
Day 2: Pelvic Floor and Deep Abdominal Strength
Day 3: Abdominal, Lumbar, and Hip Strength
Day 4: Coordination
As a general rule, you can aim to do these exercises three to five times per week to see results. However, every person is different. Listen to your body and never push through pain!
Download this checklist to help you keep track of your core exercise routine.
| DISCLAIMER: Always consult your physician before beginning any exercise program. This general information is not intended to replace your healthcare professional. Consult with your physical therapist and healthcare team to design an appropriate exercise prescription. If you experience any pain or difficulty with these exercises, stop and consult your healthcare provider. |
Core Strengthening Exercises for Parkinson’s – Part 1 of 4
Day 1 Focus: Spinal Flexibility
An important part of core strength is making sure that your joints are in proper alignment. Over time, especially with Parkinson’s, that alignment can become compromised.
Muscles tighten.
Joints stiffen.
Posture suffers.
This is why, during the first week of our Parkinson’s Core Strength Exercise Mini-Series, we’re going to focus on improving the flexibility of your spine and the muscles that surround it.
The four exercises described below are designed to loosen you up and help you regain proper postural alignment so your core muscles can work as they were designed.
Perform once daily for best results.
Exercise 1: Knee to Chest with a Twist
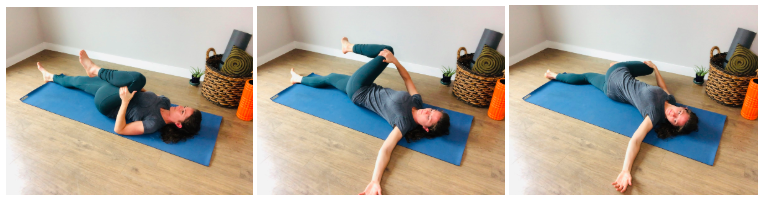
STARTING POSITION: Lying flat on your back, legs straight.
- Pull your left knee to your chest, holding behind your knee with both hands.
- Gently rotate your left leg to the right, putting your right hand on your left thigh.
- Gaze over your left shoulder, reaching your left arm out and keeping your left shoulder on the floor. Let gravity pull your left knee towards the floor. Breathe deeply.
Hold the twist for 5 deep breaths.
Switch and repeat on the right side.
Perform 2 times per side.
Exercise 2: PWR! Twist* Prone
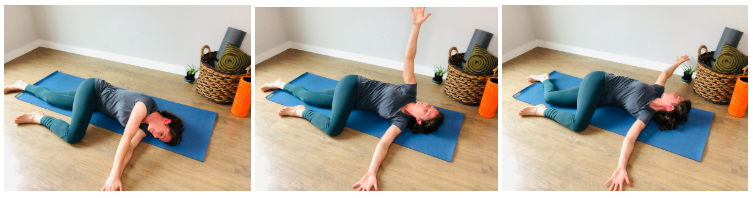
STARTING POSITION: Lying on your left side, head resting on the mat.
- Bend your right knee and bring it up to hip level, knee resting on the floor. Straighten your arms in front of you, elbows straight and palms together.
- Keeping your right knee on the floor, open your arms. Reach your top arm up toward the ceiling and then back behind you, twisting through the torso. Keep your fingers spread, elbows straight.
- Twist your torso, aiming to touch your right shoulder to the floor. Try not to overextend your shoulder. Keep your right knee on the floor. Breathe deeply, exhaling as you twist.
- Return to the starting position.
Repeat opening and closing your arms in a deep twist 10 times.
Switch and repeat on the opposite side.
Perform one time on each side.
*PWR!Moves ® is a PD-specific skill training program to maintain or restore skills that deteriorate and interfere with everyday movements. Dr. Becky Farley created PWR!Moves® as the EVOLUTION of her original LSVT BIG® exercise program and you can read more about it at www.pwr4life.org/moves.
Exercise 3 (Option 1): Child’s Pose
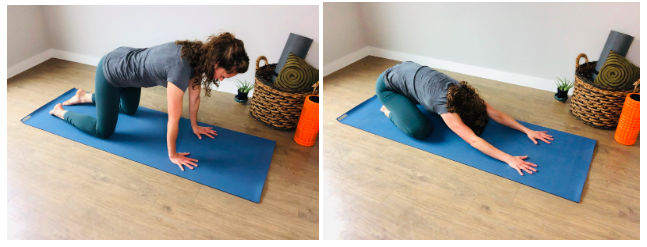
STARTING POSITION: On hands and knees.
- Line up your knees underneath and slightly wider than your hips. Press your palms into the floor, flattening your fingers against the floor and straightening your elbows.
- Keeping your hands and knees planted, push your hips back towards your knees until you feel a gentle stretch in your low back. Push your hands into the mat. Breathe as you sink deeper into the stretch.
Hold this position for 10-30 seconds.
Repeat 2-3 times.
If this doesn’t feel great on your knees, try Option 2.
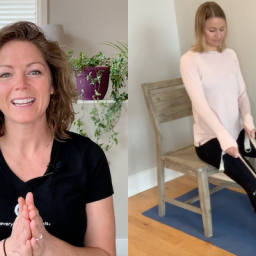
Exercise 3 (Option 2): Flat Back Foldover
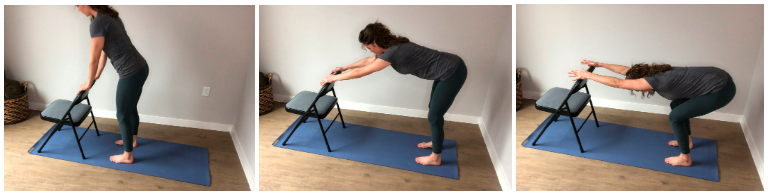
STARTING POSITION: Standing.
- Stand behind a sturdy chair, hands gently resting (not pulling) on the back of the chair.
- Walk your feet back, keeping them hip-width apart, until you feel you’re reaching for the chair. Gently rest your hands on the back of the chair, pressing firmly down. DO NOT PULL ON THE CHAIR.
- Bend your knees deeply, pushing your tailbone towards the back wall. Keep your elbows straight, fingers relaxed, aiming to bring your ears between your elbows. You should feel a stretch in your shoulders, hips, and low back. Exhale as you stretch deeper.
Hold for 10-30 seconds.
Repeat 2-3 times.
Exercise 4 (Beginner): Head and Shoulder Press in Lying
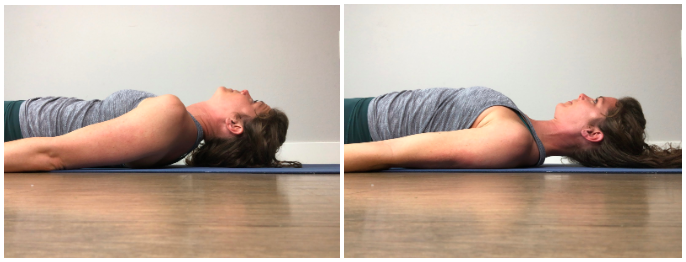
STARTING POSITION: Lying flat on your back. If your head does not touch the floor, you may put a small pillow under your head. If you have low back pain, put a small pillow under your knees.
- When you lay down, you may feel your head fall back, pushing your chin in the air. You may also feel your shoulders round forward because of tight chest muscles and a stiff spine.
- Open your chest and press your shoulders back towards the floor, sliding your shoulder blades underneath you. Then gently tuck your chin, elongating the back of your neck. Keeping your chin tucked, press your whole head and shoulders into the mat.
Hold for 5 seconds.
Repeat 10 times.
When you’re able to comfortably get into the position above, try adding an additional challenge by doing this exercise against the wall.
Exercise 4 (Intermediate): Head and Shoulder Press in Standing
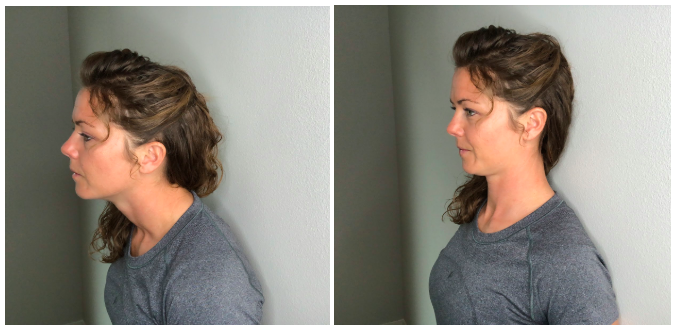
STARTING POSITION: Standing with back flat against the wall. Try and stand as straight as possible with your back, shoulders, and head against the wall.
- At first, you may notice you’re unable to get your head flush with the wall because of rounded shoulders and a forward chin.
- Pull your shoulders back, opening your chest, trying to slide your shoulder blades behind you. Tuck your chin, elongating the back of your neck, aiming to press the back of your head against the wall. Keep your eyes looking forward.
Hold your most upright/aligned position for 5 seconds.
Rest and repeat 10 times.
Exercise 4 (Advanced): Head and Shoulder Press in Standing with Angel Wings
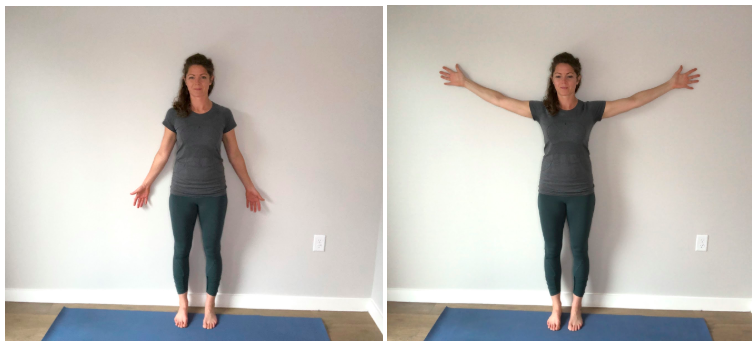
STARTING POSITION: Standing with back flat against the wall, hands against the wall with palms forward. Try and stand as straight as possible with your back, shoulders, and head against the wall.
- Pull your shoulders back, opening your chest, trying to slide your shoulder blades behind you. Tuck your chin, elongating the back of your neck, aiming to press the back of your head against the wall. Keep your eyes looking forward.
- Slowly slide your arms out like wings, maintaining your best alignment in your shoulders and neck. Keep the back of your hands against the wall and open your chest as you slide your hands as high as possible. Slowly return them to the starting position.
Perform 10 “angel wings” without letting your head or shoulders leave the wall.
Rest and perform a 2nd set of 10.
Download the pdf of day one exercises here.
We’ll be back tomorrow for part two of the mini-series.
About Dr. Sarah King, PT, DPT
 Sarah is a passionate Parkinson’s advocate who founded Invigorate Physical Therapy & Wellness, an online wellness practice 100% specialized in Parkinson’s disease, to help her clients get out of overwhelm and into action by connecting them with the tools and support they need to thrive over the course of their Parkinson’s journey. She lives in Austin, Texas with her husband (and favorite human), Matt.
Download the PDFs from this Parkinson’s Core Strength Exercise Mini-Series for free here.


excellent