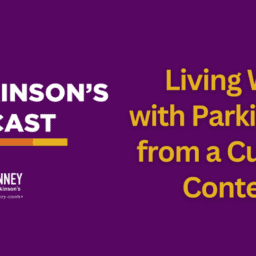
During our monthly dose of joy in July, we made neurographic art. Watch the video below to follow along. And, if you aren't already registered for our monthly joy break, be sure to register today to be notified of all upcoming sessions and receive the recordings straight to your inbox.
To download the audio, click here.
Read the transcript below or click here to download.
Jackie Hanson (Program Manager, Audio and Visual Production, Davis Phinney Foundation):
Welcome to Joy Breaks with Lorraine Wilson through the Davis Phinney Foundation. My name is Jackie Hanson, and I am a staff member with the Foundation. And like I said, we're here with Lorraine today to do a little joy break. Lorraine is an ambassador with the Davis Phinney Foundation and a wonderful advocate for joy throughout her life and a wonderful artist. And today she is going to be showing us neurographic art, which I can attest personally is really fun. So, I'm really looking forward to it. So, with that, while I admit our final few people coming in here, I'm going to let Lorraine introduce herself and get this show started.
Lorraine Wilson (Ambassador, Davis Phinney Foundation):
Hello everyone. It is wonderful to be here with you and I'm so glad that you are here. Today I think we're going to begin as usual with a little warm up, a little lettering, and then get into the neurographic drawing, which if you've seen a couple of the other webinars for the Davis Phinney Foundation, I have approached this before, but it's a topic, as I was telling Jackie, that it's never old. It's always new. I can do it. Like this morning, I was doing one that surprised me. And so, I thought, gosh, how long have I been doing this? And I found something new and different and fun. So, I hope it will be marvelous for you. What I like mostly about these drawing techniques is that they allow me to quiet down. They allow me to just get away from the world and enjoy.
And I like to write enjoy with a little E, a little N, and a capital J, capital O, capital Y. So, enJOY what we are doing. And I don't know where you're located, but it's very hot here. So, if I start sweat sweating, it's just because I'm upstairs and this air conditioner can't keep up with the heat. So, I asked it to be 78 and its riding at 81 and 82. That's the way it goes, but I'll try not to get the papers wet, you should be able to see everything we're doing, and you shouldn't see anything that bad.
Jackie Hanson:
And Lorraine one quick little thing. I want to remind people too. If you would rather see Lorraine big on your screen, just a reminder, there is an option in the upper right-hand corner that says view with a little grid of squares on it. If you click that you can choose speaker view and then Lorraine will be the primary face on your screen. Just wanted to share that.
Lorraine Wilson:
Hi Sarah. And also, I'll be sharing the screen most of the time. So really the, the art, you know, what we're doing should be the bigger screen. I think you'll be able to follow better. Thank you for that, Jackie. You know, the concept of lettering and doodling and then art as it expands and
changes. When you were a kid, if you were like me at school, you would doodle on the edges of your paper. Maybe not a spelling test, but you know, if it was your notes, your papers, you would doodle all the way around the edge. At the gym this morning, I noticed that one of the persons in the gym doodles all the way around the edges of their workout, their written workout. And I thought, well I love that. Why haven't I been doodling on my work out?
But there is a really interesting, actually, there are very interesting studies by researchers, and it said the bottom line is that spontaneous squiggles, now you have to like those two words, spontaneous squiggles and sketching by adults really actually link to improve our memory retention and to reduce stress. And I'm all about art as a stress management technique, definitely joy for me is a stress management technique. So, let's see if we can share screen and get some of this going. And I hope you'll use chat, sometimes I forget to check it, but I'm confident that Kayla, Sarah, Jackie, somebody's going to check now and then, and help me. So, let's see if this works. Share screen, there it went. Ok. Put it back. Sorry about my hand, but I don't want to touch the buttons later, so. There we are now we're in the right direction.
Okay. So, we're looking at neurographic art, as you can see, and these are some examples I'm going to show you in a minute, but before we do that, we're going to warm up. This has been our warmup to date. If anyone's here for the first time today, I'll show you quickly. But many of you, I do believe were here before. In fact, I saw Kathy's name from Rochester, Michigan. My aunt is in Rochester Hills, so I was close, right there next to you. But for those that have not yet done this, the circles, we do a counterclockwise circle, we do a clockwise circle. To warm up, we start at the center, and we go out on each and then we again draw circles. And now when we do the lines, we start at the center and go this way.
Interestingly, I don't know about you. I've discovered that this is easier for me. Why? I couldn't tell you, but this is what I have been practicing more because it tends to be when I start here and go in. Yeah, it's just not quite, I don't quite get the center all the time. I don't know if you've learned something about yourself doing that. I warm up today though. It is actually going to be a little bit different. I still took a piece of paper and I folded it and then I folded it. And I think you, and you don't have to do that. I just like to do it to have quadrants and what we're going to, I think I'll turn it this way so, it won't flip up, but our warmups today are again we're going to look at using our hand from the wrist down and then we're going to look at using our arm movement.
Okay? So, from the wrist down, I just go into this first quadrant and I'm just going to make lines as if I was going from bottom left to top right of a square or of a line. Now they're very messy. I get the bottom a little bit lined up. So, if I draw myself two horizontal lines, or if you have lined notebook paper, then you know, I can perhaps, and I'm trying to be equal distant. I might want to be closer. I might want to be further, but that just helps me start to get some small, some
fine motor going on. Now for the bigger movements, I'm going to take from the bottom of the actual square, I'm going to take my whole arm and move up since I have a little more distance, you’ll notice I get a little swaying on it. It's okay.
So that's fun. And then going to come back and I'm going to criss cross it. This is actually called crosshatching. It's used for shading in art. I mean in a much better way than this. And it's also going to be used in zentangle if you're with me, when I get to do that, it's also used partially today. For example, as a preview, you'll see where these intersections are all very abrupt. It's aligned, aligned, like an X, right? Well, what we're going to do today, and as part of our art is to soften those intersections. This is not a good example with this pen, bleeding through this paper, but it softens it instead of being, it's now rounded.
We'll talk about why we want to do that in neurographic art in just a moment. Okay, so, for the bottom half, you know how with our lettering last time we talked about the warmups, and I mentioned it was like second or third grade, I was introduced to cursive. So now we're just going to do these little, whoa, that was sharp. Gonna do some little circles and we're going to see if we can overlap our circles. You can tell that my carbidopa levodopa isn't a hundred percent with me at the moment. It also could be lack of sleep, but you know what? No excuses, we're going to have fun. This is not a problem. Well, that feels better. Part of it might be the pens. It's not a pen they always use. Let's go bigger, whoop, too big. Let's go figure, Ooh, this one's a brush tip. Well, that's fun.
Then try the other direction. I tend to go downhill. They used to say with writing that you are an optimist if your writing went uphill, pessimist if it went downhill. So that's just the simple warm-up today. Cause I want to make sure we do have enough time to finish our entire project, but for lettering, I want to remind you before we looked at this alphabet called scribbles, and I forgot to mention that it's from a person named Lindsay Ostrom. She has this delightful book filled with alphabets, Creative Hand Lettering with Lindsay. I don't know if I can give her that ad, but I just did. And I want to just quickly get out a piece of paper, get out a little scribbles, get a little bit different color pen. And what I like about this is like, for today, it seems like maybe my hands, my arms, you know, aren't cooperating with me.
And I did have a very good workout. Maybe that made my hands tired, but also can you see my phone? I smashed it in the truck, pickup truck. Luckily, it's not worse. It's not broken, et cetera. But with all those things combined, I think this would be a good alphabet for me today because it's just scribbles. Well, you know what? I can do scribbles, yay. Little joy in finding something that feels very good even if my hand is a little shaky or my thumb, maybe. Whoops, that one's not there. Then I love this one, she uses multiple colors. So, you know whether you like this one, this one, this one. Oh, and you could do this. Let's see which side I want to do. Let's go 1, 2,
3, 1 that be, let me do that 1, 3, 1. Yeah that’s kinda fun. I don't know how I do this, Maybe I could do it like this. So, playing with the letters is fun.
So having mentioned scribbles before, I just wanted to bring it back to give credit to Lindsay Ostrom and while I was making that cover, I thought that I would show you this, this one, she calls the right type. And all she means is the right type is the one that you want to use for your project. She gives the example here of a circle with a very, you know, tongue in cheek, “I'm very font of you because you're just my type.” Yeah. Well, here's what I want to show you. Maybe with circles, you noticed my circles weren't so good. Right? Well, there's this little thing called a pattern. So, I'm using my tape. That's handy dandy, and I'm just going to draw myself a circle. That's fun to do. And then probably, I know actually that I would do this. Get a pencil. You can use another piece of paper. You can use a ruler, but I am going to come right here and I'm going to put my first line. So that's going to be, “I'm very,” “font” can be right about there, “of you” it’s not very big. And of course, all of these lines can be erased.
We have to make something a little bit smaller. Here, let's do this. Okay. So sometimes when I have just a few minutes, I just have a lot of joy making something small and you might notice these look like if you're a person that celebrates Christmas and has Christmas ornaments these are really fun to do on a thick watercolor paper and any colors, like if it was for Christmas, and then you can decorate the outside edge and hang it on a little string and have it be a little Christmas warmer. But here let's say we're going to do this one. So, her I, well, I need to do it pink so you can see it better. But if you wanted to do it in pencil first, you can. So, her I is two lines. Then the top one here, I'm going to do it bigger. Two lines. Top one goes that way. Bottom one goes all the way across and then her apostrophe, “I’m,” and then we're going to go like this.
So, you just fill in and she uses different types of letters. You can see here her many examples and you can find things on Pinterest, YouTube. Lindsay Ostrom actually has a group, a Facebook group page for herself and for every day at 10:00 AM, well weekdays 10:00 AM my time. So 8:00 AM Pacific, 8:00 AM Pacific. And then just however, your time falls, she does an hour free lettering and doodling. And I started this during the pandemic and have really grown to appreciate how good she is. She just whips out something. And I'm not that good yet, but I sure have fun. And so, you could color this some or all. You can shadow it. I've already showed you in previous times together, the grade pens I really enjoy using. And I can show you again, as we work on a project today, but that is just another way that you might. So, if this was “I’m very,” and then we'll get our “font” and she puts a little heart in here and you know, you can just make this anything you want. And it's fun. You'll notice here on the background, I believe I've shown you a smidge of this, but she will draw just not straight lines on purpose. So, she’ll dance them across the page and fill them with a pattern and or fill them with the color. And you just made a very colorful little thing to share with someone or even to put on a greeting card.
As I mentioned, I worked out so I may be a little dry, so a little warm up a little lettering, always a good way for me to start what I'm doing.
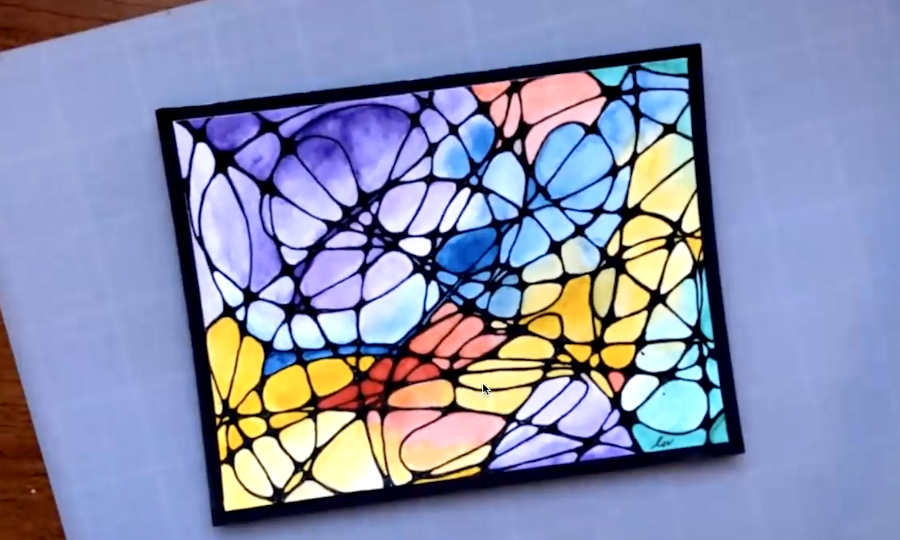
A little background on neurographic art. Again, this was a pandemic thing. I found it when I was hunting for something to do. And sure enough, I found this and its upside down. How I know it's upside down? Cause I initialed it there, that's where I wanted it. This is my actual first piece. And if you like it, but I have to admit, I kind of like it, I’m not trying to brag, but I just kinda like it. It really is something that you're going to like the very first time you make something and if not, what's wonderful is there are no mistakes. So, I've had some that I've done that I go, Hm, not my favorite.
So, I come back to it a day or a week later and I go, ah, I like it. Or I can fix it. So, the idea behind neurographic art, besides that finished product of looking like that, and you can also make it, you know, actually look like something you could, perhaps pre-draw a seahorse shape or pre-draw any shape you want, fill it with neurographic art and that's something too. But the idea is that we take a personal challenge. This was actually developed by a Russian psychiatrist, psychologist, not a hundred percent sure who wanted a way for people to be able to mindfully use their hands while creative, pursuing a creative endeavor that would help them relieve a stressor or maybe even think of a solution to their challenge or at least a next step by just kind of doing something else to distract the mind and let it relax and think. So, on the back, this is actually the back of the paper I'm going to use today.
Now I'm using a mixed media paper. You might just be using paper off your printer, which is perfectly fine. You might be using anything. It could even be a different colored paper. Colored paper is wonderful if especially if you have a white pen or a silver pen, but black, it should work as well. So, I'm using this, and it's cut to about three and a half by five because I'm going to actually put it on the bottom of a blank greeting card. When we finish today, I am going to be so lucky because I am going to have a greeting card that I can send to someone. And it has my scatter joy on the back. And if, once I finish it, I don't like it with the yellow. I also made a purple one. So that's why I have this small piece. And I do highly encourage you to fold your paper and or another thing I like to do is if I am going to use this paper, but I don't really want it that big, you can make this straight or you can do it cattywampus, do you know cattywampus? Let’s do it cattywampus. I’ll show cattywampus in a minute. But you can take tape. Now, this is removable, it’s painter tape. Scotch tape could an issue, but it might work. But if I do something like this, then I am going to end up with something like this.
So, what I did, you can see that instead of being straight top and bottom and left and right side, I went cattywampus and this is actually a greeting card. And I used these colors to kind of make an ombre but it's different colors. I don’t know if that's a true ombre, but I went dark light, and
this is the one I did this morning. And I started, I taped it, but I didn't tape it at the edge. I taped it inside, which is my habit, but I had never done it this way. And I go, I don't think I like those plain edges. So, I drew these little lines. I love that. I might put a joy right here. Well, I have quite decided, it's not quite finished, but that's what's fun about this. This one, I used a white paint pen, so white on dark. And then I came back with a stamp.
I think I had previewed that for you guys. So, since I know that this is the size I want, before I can tape it down, I need to write my challenge on the back. Now it doesn't, you may have no challenge. You may have no concerns or worries or problems. You can also make it a praise, something that’s going well that you want to celebrate. In one month, my husband and I are going to have our wedding anniversary. What year is this? It’ll be 45 people, 45. That’s something to celebrate. But a challenge. Anything you want to write on the back, and do you have to write something on the back? No, you don't, but it is, I think, an important part of the process. I would encourage you to write something on the back. I do it in pencil in case I want to erase it later. You don't have to. So, I'm going to write mine. You write yours. Okay, so I've got mine.
Now, I am going to tape it. And the reason I like to take it is because I like those white margins. So, sometimes I actually use a ruler and measure, but I can actually see the white paper through the blue. Can you see that? So, I just want that little bit of what, quarter inch “ish,” I’m an “ish” kind of person. Excuse me. It’s hot and dry here in Texas. I don’t know if some of you are in Texas. Now, I don't so much push the outside edges very hard, but I do want this to be a clean edge on the paper and off of this media paper or watercolor paper, the tape comes off quite well. Thinner paper, not quite as much, but I even enjoy the setup. I enjoy getting it ready. I enjoy taping. I enjoy thinking about it. A little short, we’ll come back to that. See, no mistakes, just penalties, it's all good. Now do you have to have tape, absolutely not.
Because in reality, one of the things I'm going to tell you next is when you're getting ready to draw your lines, your initial lines go off the edge. You can see, especially on this one, that when I was doing this, and it's actually called a scribble. So, there we go for our spontaneous squiggles, these may be plain squiggles. But everything goes off the edge. Now on this one, I did not do anything. When I got to the edge, I left it straight. Then as I got into doing it more, I thought, well, maybe that should be curved as well, but you get to decide. So, you have your challenge or your celebration. Now you want to use black. If you have black and it might be an ultra-fine or a fine Sharpie, it might be any kind of marker at all. I'm actually going to use a thicker pen than I would normally use, because I want you to be able to see it in the camera.
So here we go. And they say, technically Dr. Pav, Pavel- something, he says three seconds, three seconds to squiggle. So, we're just going to say one one-thousand, two one-thousand, three one thousand. So however, slow or fast you want to begin this, let's do a three second
squiggles. Everybody has a pen? Got yourself ready? I hope. Bottom left, top right, you start where you want. Go whichever direction you want. Begin. One one thousand, two one thousand, three one thousand. Okay. You can keep squiggling if it's really important, that's fine. Now let's say this is my squiggle. You know, I've got a blank spot here. I don't like that. I'll come back. This is so, yeah, it's OK. I'm pretty good. That spot I'm not so sure about, for some reason that corner looks blank. I have options. I could draw a line right now. Sometimes. Dr. Pavel, whatever his name is, he says use something again. If you want to now put in a more formal shape. So, I could use this and I could draw a circle and it'd be that size. I could use this, and I could draw a circle and it would make more intersections. It would be that size. And it's really fun. Anybody have scissors near them? I'm going to use my scissors. I'm going to go right here.
Now it moved a little but that’s ok, because I'm going to fix it. Oh, I like that shape. That's all I'm going to add. It kind of matches this shape. So right now, I like it. I'm ready. So, the concept again, is that you wrote something on the back or maybe you're just thinking of something or really you don't want to think of anything. Instead of being mindful, you'd rather be mindless because that allows you to be mindful and relax. Here's how we circle. Oh I'm sorry, here’s how we soften the curves. Let's go to this one. You can see that one clearly, I think. So, instead of that X I'm going to come in and you can make this however small or big you want.
And if you don't like the shape, you can come in and you can change your shape. I find typically that I also go back over my lines when I'm doing this, you don't have to, but I typically do. So, if you want to just start filling in your own little intersections and take the sharpness out, put some smoothness in. Some people really like to have music on. And that can be a wonderful thing. I don't want to accidentally play anything that we don't have copyright to or what have you. You might find yourself humming a little song and sometimes I'll take a piece and I will just round as I go. Did you see how I did that? It's fun. And right here, I'm going to do a little circle.
So sometimes I round by approaching it from a different angle. I want to mention that my pen is microns. After a couple of seconds, what I put on paper is waterproof. And the first two seconds, they're not, it would smear if I touched them. If you're using something that's not waterproof, you're not going to want to do the same thing that I do at the end, because I'm going to use watercolor and that would make yours blurry, but you sure could use other mediums. Markers, crayons, pencils. I see Cid’s here, I don’t know if she has friends in the kitchen with her, that was fun. Depending on how good your eyesight is, et cetera, you might see that I like to try to catch up the spots I’d left.
Now does anything art wise say that you have to do every single intersection. Well, Dr. Pavel might have intended that, but you know, I think of ourselves as owning our artistic license. If you like, like I could do perhaps the center and leave the outside plain lines. You can do what you want. And I have to tell you, mine is my husband has a medical test tomorrow and it's not
his favorite thing because his neck gets uncomfortable in the MRI. Maybe I should get him to do one of these before he goes. Relaxing, see? So it’s really solved, or at least I have a potential solution.
I also sometimes mutter a lot while I'm working, but don't worry if I'm talking to myself, I don't answer, isn't that what they say? It's okay if you talk to yourself, you might not want anyone to answer. Now at this point, I do want to mention. Yes, I wanted a solid line all the way around this. I could just trace that tape. It is sturdy enough to do that. I’m liking this. And sometimes you see shapes and things. I created one of these once and I looked at it. I go, oh my gosh, it's an octupus. And it was, it was kind of purply. I really liked that one, but you don't have to see something in it. That's not really the purpose.
Tell you what we might do in the chat. Actually, I can't see, oh, chat's up at the top. If you want to tell me if you want watercolor, pencil, watercolor pencil, marker, I'd be happy to get that out and use the medium of your choice today. Remember that stray mark I had earlier? There it went, let’s get rid of it. I see circles like this big thing here. Doesn't call for an intersection. I might like that, but it might look like an egg to some people. I don't know. But I can always come back, and this is where I could go, wee, now, it’s an intersection, but you do what you. I just didn’t like that, and now, I like it.
It solves my own problem. Fine motor control. If you have micrographia, doing this on bigger pieces could be good. You get your hands trying to make things bigger instead of smaller. Or if that's hard, then celebrate the micrographia’s effect on doing this small. I did one of these with a very fine pen, on .05, and I did it, it's pretty much postage stamp sized. Cause I like to do things in miniature when possible, at least to explore. Oo that looks like, I could make that with paint into a {inaudible}. Not that I have to. I also once upon a time, saw someone do this on a black paper with a very fluorescent looking metallic green pen and it sincerely looked like neurons. And that's another thing that Dr. Pavel wants people to know is the idea is, that we are activating neurons in our brain when we do neurographic art. See, that's why he’s calling it that. And the idea is for those of us with Parkinson's or Parkinsonism or anything else that's neurological, it's to try like exercise can release endorphins, well, this art helps release, not release, but encourage neurons to fire. And I’m all for energizing those little guys.
So, you get function and beauty. Okay. Now I always have to go back and double check, did I miss something? Ope, there’s one. Here's one. You know, I don't like that itty bitty spot, so, I'm just going to fill it in. I like those others. Oo that one’s good. And I will admit sometimes I start on the left side just so my hand doesn't drag on it. Just like a lefthanded person might start opposite. In case you have any kind of pen that is prone to bleeding on the paper, your hand won't be crossing over it. But today I didn't do that and that's okay. A couple more. Right here. How are you doing?
We're going to take a joy break in a second. Got to have a joy break in our joy break. Go into our joy jar. You keep drawing. I'm going to get the joy break out. Keep drawing. Keep drawing. Or as Dory says, keep swimming. All right, joy break jar. Here we go. Joy break. Let's see what it is. You keep working. On top. As my joy jar gets low, I put more on the bottom. Okay. This one says, oh, we can do this. Massage your hands for two minutes. I don't know if we're going to spend two minutes doing it, but sometimes it just feels good. I'm going to take my ring off. Couldn't get the safe open this morning. Couldn't get my other ring out. So, I love these Silicon rings. They're just nice and hot weather. So, I'm just going to do a little massaging. Again, let's get this thumb, see if we can make that feel better.
A foot massage would be nice I bet. I'm pretty sure I have a foot massage in here as well. Something to bring just a little bit of relief, a little bit of joy to a few moments in our day. Good to have your joy jar in a room that you're frequenting throughout the day or in the kitchen if you're a person with maybe lots of cooking or you like cooking, baking, that's a good place to put it. Now I’m gonna put that one on the bottom next time. Ooh, that just felt good to make my hands not feel cramped. I like it. If you want the full two minutes. Go for it. Okay. Now does it say in the chat if we want any particular, ooh, watercolor pencil would be great, okay watercolor pencils. We got it.
Oh, now I gotta get rid of that thing. There it is. Let me get my watercolor pencils. Excuse me. Let's see. These are watercolor. Alrighty, watercolor pencils. I know mine's not quite exactly finished, but I'm going to get the paint started. I have this fun little collapsible cup. I think I showed you guys that once. It sure is nice for travel. Nice to bring upstairs. Got a little bit of drinking water, we’ll just pour some in there. I didn't fill my watercolor pen for this, but it's just going to take one second to get it down. Not a problem. We need to be flexible. Here we go. Brush.
Okay. Now these are those pens I've mentioned to you on previous little videos. So, you can squeeze it, put it in water and it'll suck it up, where you have water in your barrel. Or of course you can fill it from your fountain, I mean your spigot. Spigot, fountain, water bottle. You can also just swish it in the water. So, let's get some watercolor pencil going. Now, believe it or not, and I don’t know if Pavel has artistic training or just what his thing is. I need to look at some more information about him, but he does recommend using three colors, five colors, or seven. Does that mean you have to use three, five or seven? No. This is not a large piece. I'm going to be using this bright yellow paper. So, I'm going pick, oh, I'm going to pick this purple…
This is interesting. Well, now it’s a little wider. Let’s go with this. Sure. Why not? So, I'm just picking those three. You pick something you like in your watercolor pencils. I'm not a big person on brands. I mean, I have some fancier pencils. Didn't get my pencils out. Sorry. These are by
Fabric Castel out of Germany. And they are called Gold Fiber Aqua, meaning watercolor pencils. And they are really rich and thick and lovely. I just didn't grab them first. These are by Arteza, less expensive, but I like the, see how they don't roll. These, I always take when I travel so they don't roll off my table on the airplane or you know, lose them. But here we go. Let's see what we want to do here. Now.
This is what I did before. I did a little dark, a little light. I did a little combo. You do whatever you want. So, let's color. I'm going to go center. Now with my watercolor pencils, did you notice I like to hold them strangely? I really don't like this because I tend to get too much of a, the point. So, I actually like to do this and if I want just a little watercolor, I can do that, but I want to get some color on here. Now you can do side by side, the same color. I can go over the black if I just want a color, I actually like to try to stay within just so I don't get the pencil paint, whatever it is I'm using all over the black and alter how dark that is because I like it dark. So, for this one, for some reason, I'm finding myself drawn, ha, drawn, drawing, drawn too.
I like that. I'm going green. Okay. Now I'm going to hit this funky blue green. I'm going to go over here. And I think actually I'll go from darker and granted, this won't really show up the way I want it to, until I put water to it. And I'm going to do a darker application and you can circle, you can straight line, you do what you like and I'm actually just going to put it very light here and then when I use my watercolor, you'll see what happens. A little bit more. That's good. That's what I want to do, like that right now. Ok, I’m going to go to my purple.
I’m gonna get some purple in here. You'll also notice that when I'm holding the pencil and this works for me, again, it might, but I don't recommend holding it really close to the point. At least be back a little and give yourself some coloring opportunity with the edges of the pencil, if you prefer to hold it this way. Yeah. So, you see that I'm further up. I'm not choking it. Yeah. Whatever works for you. I like it. You have to enjoy something that you're saying, I like it, this is fun, and or you think the product, or the end process or the end of the process is going to be something you like.
I'm going to go really dark with this. Opposite of that blue. And I really quite a bit think about process over. Ok, I got that corner. I'm going to get this corner. It's just me, you do what you like. I’m going to do this corner. I’m going to finish this one line. I can do one line or one shape. For those in the states, I hope you had a good 4th of July. We had a picnic, a little parade, we had a neighborhood parade, that was fun. You could do this in red, white and blue. Okay, good. I’m going to do this corner. And just because I don't want to run out of time while we're coloring, you keep coloring or watch this if you want to. But I am going to show you the, what happens when we start adding. If you have a lot of water on this, you're going to get a lot of water here, which is fine as long as you're prepared for it. If you want to have less water at first and then build, that might be smarter.
I don’t know about you guys. But when we get something at fast food, instead of two napkins, one for each of us, we get 50. You know, I think their bosses need to teach them to count napkins or something cause that has to be expensive. The good news is for us artist folks, we get lots of paper without having to waste paper towels. Or, all of my friends like to paint with a rag, but I don't like a rag. It's not for me. I'm actually going to go to this corner and I'm going to see how light that is in case I might want to add pencil. I’ll darken it. But basically, you're liquefying the lead that you have placed onto your art piece.
I'll swish a little bit between colors. I'm going to go here. I'm excited to play with this one. So, we're going to, ooh yeah, I like the rich color and it does get lighter. That's what I wanted. You know, I don't always get what I want, but it's nice to think I have some control. You know, people with Parkinson's thinking they have control, what are we thinking? I like that. That's fun. Now the one thing about using the colored pencils for me, I haven't figured out a perfect way yet, but see how I get these lines. So usually, or often I will, there's a broader brush that I can use. I just didn't bring it up, but I will do this just to maybe see if I can get those lines out.
And then what's really amazing is if I wanted to, I have enough paint on here or enough pencil, I can actually go in and color something. So, I got four light purple corners. Got a nice, pretty blue, go in here for this purple, which of course I could have done all my purple ones. Hey, do you have to put water on watercolor pencils? No. We don't. Now if any of you know a better way of using these brushes, but again, I only brought the one brush up, but if you have already figured out something that would work for you, you tell us in the chat or unmute yourself and talk to us. And then, oh, this is fun. What if I want to get a line? Yeah, that almost looks like a smile.
Interesting. I don’t believe I've ever seen that before. You know, that's what's new and wonderful and fun each time and now, I'm going to get myself a light purple here, and here. Now what about blending colors? So let me get a little of this purple and let me go to the outside. Now, granted, I may not like those two colors blending, but you can blend, you guys might use a color wheel. I'm not an expert with a color wheel, but I do like that it has complementary and contrasting colors. I really love this blue. I'm going to lay some more blue on it. We have a few more minutes. Yes, we do. I wonder if, we go with the shape and the stripe and when I get water on it, if the darker parts remain. Let's see. Another person I like watching on her Facebook group page. And again, starting in the pandemic is Amy Miracle. And she says, what if, while you're working with your art, you were to say, what if I did this? Or what if I did that?
Can you bring pencil back on over wet? Yes, you can. That's interesting. And you can do this too. You can get something wet using water. Of course, it's really cool to put watercolor on
something like this. And if you do it with salt, oh, you get the coolest bing. So, the question is, will this take it and run? Not so much, but again, so this is dry on wet instead of dry on dry and then, you’re just using one. Now maybe this kind of art or artistic endeavor, creative endeavor is really not your thing. You might be someone who quilts or uses fabric for things, crochet, knit. You might be someone with sculpture, whether it's plaster, clay, wood, what have you. Whittling wood, that's fun. I could see something like this being done with fabric. Can you? I really can. Let's see. I think I will add purple over here.
I think instead of that green, I wish I had used yellow for this card, but the good news is my backup card is purple. So that might go better with purple. I don’t know what you think. So now I'm going to go from here, I’m going to get something pretty dark. A little bit of light, then this darker. Then this one I'm going to do dark here. I haven't gone to five colors. Could I? Sure. Let me see what I can do. I'm going to do dark here. Now I'm still aware of what I wrote on the back. And so, this, you know, this rhythm of moving my pencil over the paper is relaxing. I like hearing it. I don’t know if you can hear your pencil or whatever you’re using. Ooh that’s fun. So, I see dark, dark, dark, dark, almost spilled my water. That'd be very bad. Cool.
And then I’m going to get this guy again, and color these two circulars. I’m going to do this one. Then I’m going to do this one. Then I’m going to fill this one with black. Ok. So, if you are going to make a greeting card or if you were to cut this up or use it in its entirety on another project, you can use double stick tape. There's only a few that I would recommend that really stick well. Of course, people look at greeting cards these days and probably toss them. Unless it's really, you know, a super meaningful, wonderful one that you've given them. I might just finish with blue. Blue, green, teal. Here we go. Ok. Brush and water. And here we go. Maybe it's a purple candy corn. I do have to wipe my brush off down then. It's get a little {inaudible}. Now, since I have colored it all, I might go in with the black. Look at that you can make little dots. That's fun. Pattern within pattern.
Ooh, that is brighter there if you put it on heavier. Okay, there you go. I like it brighter. Who knew? Well that tells me I’m gonna come back. One right there, you can see that blue blend in where a little water was letting that touch. Oh yeah, I like that more intense. Obviously, this is quite abstract just as far as the painting goes in this particular style, unless you were like I said, to make a shape on purpose and then fill it with the color. Now I try not to let this go like this. Get that extra water off there. Oh, and by the way, some paper towels have patterns on them. If you have your, well here, let me do it. So, I'm getting this colored in. I'm going to go ahead and put on a little bit more generous helping of water. Now with your patterned paper towel, or napkin or what have you and see that doesn't have much pattern. Let’s see. Yeah. So, here's my wallpaper that has some pattern to it. I'm going to put it on press once lift and it'll leave the pattern. That's a fun thing. Oh, almost time. Okay. I'm not going to be able to finish, but there you have it. And like I said, I think that I would put it on the purple card. That'd be fun. Is the yellow? Well, that's not bad. I don’t know. But you know, we don't always finish our projects together, but we know what we're doing.
Jackie Hanson:
Thank you, Lorraine. Thanks everyone so much for being here today and hopefully we will see you next time. Bye everyone.
Show notes
We had a great time at this week's Joy Break learning about Neurographic Art. Here are some key takeaways:
- Creating neurographic art is never the same experience twice.
- Doodling is a great way to get your juices flowing, help you relax your hands, and tune it to how your body is feeling.
- You can find Lindsay Ostrom's scribbling book here.
- Use whatever tools are at your disposal. Lorraine used a roll of tape to draw her circle.
- Lindsay Ostrom goes live on Facebook every weekday at 10 am CDT to doodle and write. You can join her here.
- It's not possible to make a mistake when doing neurographic art. It's a practice designed to help you think of solutions to your problems while focusing your hands and body on something else.
- Sometimes, you'll see shapes in your art. Sometimes, you won’t. The goal isn’t to create anything specific, it’s just to move your hands and have fun as you make art.
- If you have micrographia, use bigger pieces of paper to challenge yourself OR celebrate your differences and show how cool your art can be when done small.
We hope you had a great time learning from Lorraine. We look forward to seeing you next time. And remember, like our host, Jackie, said, “There are no rules in art, just the process”.
mentioned materials
The Memory Benefits of "Spontaneous Squiggling"
Faber-Castell Watercolor Pencils
related resources
[Webinar Recording] Envelope Book with Tags: A Joy Break with Lorraine
[Webinar Recording] Lettering and Doodling: A Joy Break with Lorraine
about Lorraine
 Lorraine Wilson, a Davis Phinney Foundation Ambassador, was diagnosed with Parkinson’s in early 2017. Just a few months later, she assembled a multi-disciplinary team of colleagues at the university where she was teaching, and her personal and professional journeys joined forces. They began an exercise study with a fresh look at resistance training with instability and cadence walking. That was followed by a study of blood flow restriction used during resistance training. Lorraine helps facilitate the local support group. She knows that the support from family, friends, and others with Parkinson’s is critical to living well each day. Maintaining a positive outlook may not be easy, but it is a worthwhile effort that lends support to others, making life that much better. One of her favorite quotations is from Ralph Waldo Emerson, "Scatter joy!" She strives to do this in as many ways as possible every day. You can find some of Lorraine's other work here.