Written by Dr. Sarah King, PT, DPT
You’re halfway through our Parkinson’s Core Strength Exercise Mini-Series!
We’ve used the last two days to practice building flexibility and deep core strength.
Today, the focus is on learning how to build strength in your abdominal, lumbar, and hip muscles.
Download this checklist to help you keep track of your core exercise routine.
Download the pdf of day three exercises here.
CORE STRENGTHENING EXERCISES FOR PARKINSON'S - PART 3 OF 4
Day 3 Focus: Abdominal, Lumbar and Hip Strength
Remember: Your “core” is made up of 35+ muscles and a majority of them aren’t on your stomach!
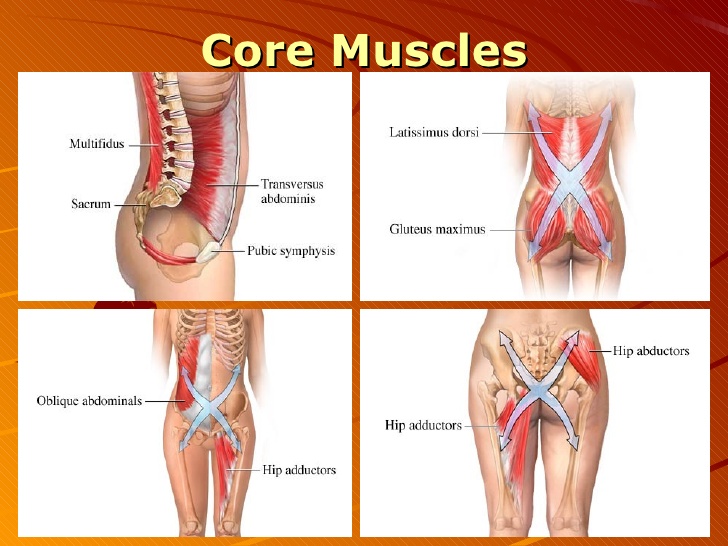
There are a lot of muscles that go into moving your pelvis, spine, and rib cage and if you’re only using crunches to train your core, you’re missing a few big pieces of the puzzle.
Perform these exercises 3-4 times per week for best results.
Does kneeling hurt your knees? Try putting a towel under them for additional support.
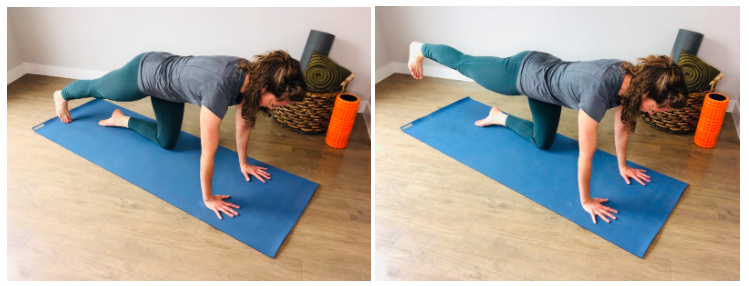
Exercise 1 - Option 1: Bird Dog

STARTING POSITION: On hands and knees.
- Line up your knees underneath and slightly wider than your hips. Press your palms into the floor, flattening your fingers against the floor and straightening your elbows.
- Pull your belly button up and in and keep your back as flat as possible. Reach your left hand forward at shoulder height. Stretch your fingers wide and keep your elbow straight. Kick your right foot back behind you and raise it to hip height. Keep your right knee straight.
- Return to the starting position.
- Pull your belly button up and in and keep your back as flat as possible. Reach your right hand forward at shoulder height. Stretch your fingers wide and keep your elbow straight. Kick your right foot back behind you and raise it to hip height. Keep your right knee straight.
Repeat 10 times per leg.
Rest and repeat for two rounds.
Exercise 1 - Option 2: Supermans

STARTING POSITION: Lying flat on your stomach.
- Reach your hands straight out in front of you. Keep your elbows as straight as possible. Spread your fingers wide and press your palms on the floor. Look straight down at the mat. Pull your belly button away from the mat and press your pubic bone into the mat.
- Keeping your belly button pulled up and pubic bone pressing into the mat, raise your left arm off the mat while lifting your right leg (opposite) off the matt. Keep your elbow and knee straight.
- Lower back down to the starting position.
- Keeping your belly button pulled up and pubic bone pressing into the mat, raise your right arm off the mat while lifting your left leg (opposite) off the matt. Keep your elbow and knee straight.
Repeat 10 times per side.
Rest and repeat for two rounds.
Exercise 2 - (Beginner): Clam
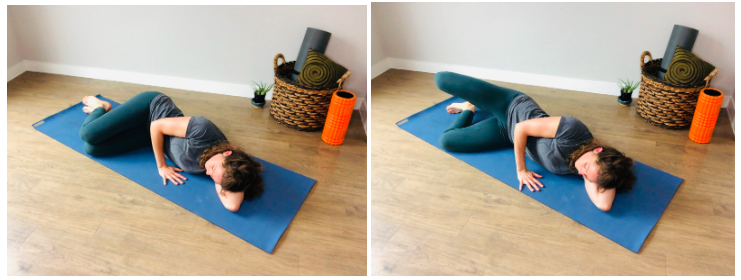
STARTING POSITION: Lying on your side, knees bent. Cradle your head with your arm, or use a pillow for neck support.
- Lying on your left side, place your top arm (right) in front of you with your hand on the mat to support you. Bend your knees at a 90 degree angle. Stack your legs and ankles. Make sure your hips are stacked and you’re not leaning too far forward or back.
- Press your heels together. Pull your belly button in towards your spine. Keeping your hips still, raise your top knee up towards the ceiling by squeezing your glutes. Pause at the top for a count of 1. Lower back down slowly.
Repeat 15-20 times.
Rest and perform a second set before switching to the other side.
Exercise 2 - (Intermediate): Side Leg Raise
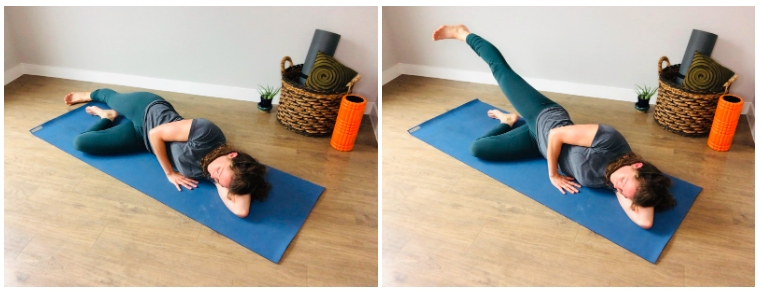
STARTING POSITION: Lying on your side. The leg closest to the floor is bent, and the top leg is straight. Cradle your head with your arm, or use a pillow for neck support.
- Lying on your left side, place your top arm (right) in front of you with your hand on the mat to support you. Keep your hips stacked and avoid leaning too far forward or back. Pull your belly button in towards your spine.
- Straighten the knee of your top leg, and pull your toes toward your shin. Raise your top leg, heel first, toward the ceiling about 2 feet in the air. Imagine your heel is sliding up an invisible wall behind you. Lower back down slowly.
Repeat 20 times per leg.
Rest and perform a second set before switching to the other side.
Bad Form Alert!
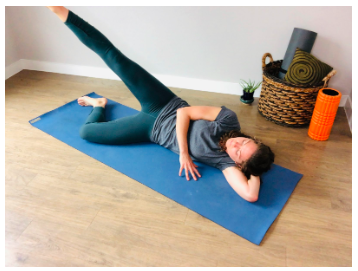
It's very easy to do this exercise incorrectly. When done correctly, you should feel muscles in the back of your hip (right in the middle of your bum) working. You should NOT feel it in the front of your hip. If you do, you’re using your hip flexor or TFL muscles.
DON’T:
- Let your hips fall backward. Keep them stacked by actively leaning forward.
- Let your leg kick in front of you. Raise it straight up as if you’re sliding your heel along an invisible wall behind you.
- Let your toes point up. Keep your foot parallel to the floor, or even point the toes slightly down to the floor if possible.
Exercise 3 - Quadruped Hip Extension
STARTING POSITION: On hands and knees.
- Line up your knees underneath and slightly wider than your hips. Press your palms into the floor, flattening your fingers against the floor and straightening your elbows. Straighten your right leg behind you, knee straight and toes on the floor.
- Pull your belly button up towards your spine. Look in between your hands. Squeeze your right glute to raise your right leg straight up towards the ceiling. Keep your knee straight. Lower back down.
Repeat 15-20 times.
Perform two rounds per leg.
Exercise 4 - (Beginner): PWR! Step* Kneeling (chair)
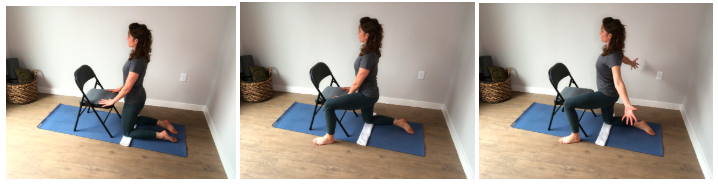
STARTING POSITION: Kneeling in front of a chair.
- Kneeling in front of a sturdy chair, stack your hips on top of your knees and shoulders on top of your hips. Gaze forward and place your hands on the chair for balance. Slightly squeeze your hips and pull your shoulders back.
- Shift your weight to into your right knee and powerfully step your left leg to the side of the chair. Keep an upright posture.
- Once you find your balance, open your arms out to your sides, squeezing your shoulders back and pressing your hips forward. Keep your fingers spread wide.
Return to the starting position.
Repeat on the other side.
Repeat 10 times per side.
Rest and perform a second round.
Exercise 4 - (Intermediate): PWR! Step* Kneeling (no chair)
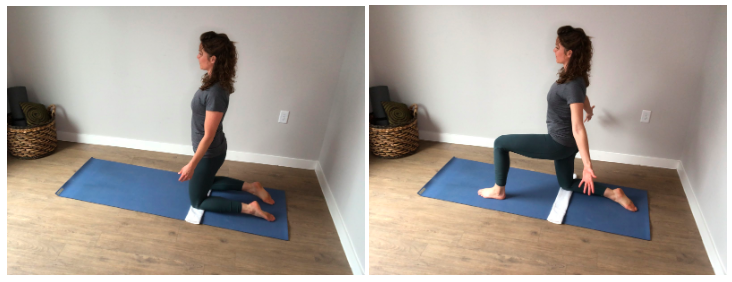
STARTING POSITION: Kneeling.
- Kneel and stack your hips on top of your knees and shoulders on top of your hips. Gaze forward. Slightly squeeze your hips and pull your shoulders back.
- Shift your weight to into your right knee and powerfully step your left leg in front of you. Open your arms out to your sides, squeezing your shoulders back and pressing your hips forward. Keep an upright posture and fingers spread wide.
Return to the starting position.
Repeat 10 times per leg.
Rest and repeat for a second round.
*PWR!Moves ® is a PD-specific skill training program to maintain or restore skills that deteriorate and interfere with everyday movements. Dr. Becky Farley created PWR!Moves® as the EVOLUTION of her original LSVT BIG® exercise program and you can read more about it at www.pwr4life.org/moves.
Exercise 5 - (Beginner/Intermediate): Elevated Plank
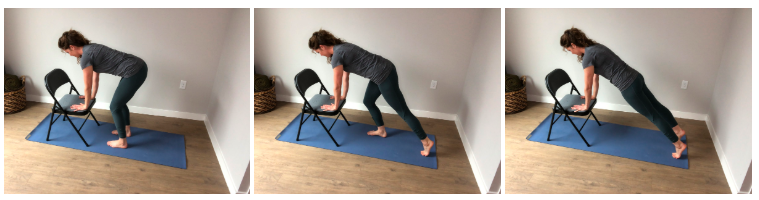
STARTING POSITION: Standing in front of a sturdy chair or a countertop.
- Pull your belly button towards your spine and place your hands on the chair. Straighten your elbows.
- Step your weaker leg back behind you as far as it can go while still keeping your shoulders stacked over your hands.
- Step your stronger leg back to meet it. Your hands should be under your shoulders. Your whole body is in a straight line from your heels to your head. Push your hands into the chair. Pull your belly button up and in. Squeeze your hips together. Breathe! This is a plank.
Hold for 5-10 deep breaths.
Walk your feet forward toward the chair.
Rest and repeat for 3-5 rounds.
Exercise 5 - (Advanced): Full Plank
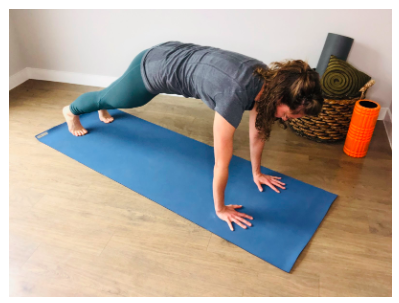
To perform the advanced version of Exercise #5, work your way down to holding a plank on the floor. You can also do this from your knees.
All the elements are the same: Your hands should be under your shoulders. Your whole body is in a straight line from your heels to your head. Push your hands into the chair. Pull your belly button up and in. Squeeze your hips together. Breathe!
| DISCLAIMER: Always consult your physician before beginning any exercise program. This general information is not intended to replace your healthcare professional. Consult with your physical therapist and healthcare team to design an appropriate exercise prescription. If you experience any pain or difficulty with these exercises, stop and consult your healthcare provider. |
About Dr. Sarah King, PT, DPT
 Sarah is a passionate Parkinson’s advocate who founded Invigorate Physical Therapy & Wellness, an online wellness practice 100% specialized in Parkinson’s disease, to help her clients get out of overwhelm and into action by connecting them with the tools and support they need to thrive over the course of their Parkinson’s journey. She lives in Austin, Texas with her husband (and favorite human), Matt.
Download the PDFs from this Parkinson’s Core Strength Exercise Mini-Series for free here.
Want the Full Series?
Day1: Spinal Flexibility
Day 2: Pelvic Floor and Deep Abdominal Strength
Day 3: Abdominal, Lumbar, and Hip Strength
Day 4: Coordination